Filters
One of the most common issues people have with CMIS is using the filters. If you are not seeing the room(s)/event(s)/course(s) that you expect to see then the first thing you should do is check your filters.
Filter Button
To display a filter button on your timetable:
- Right click on the graphical view of the timetable (grey boxes).
- Scroll down to configuration.
- Then scroll down to Buttons – a button will appear on the right hand side of the timetable.

See also:
Apply a Filter - Graphical View
Always clear your filter before applying a new one. This ensures there is nothing unexpected left entered in any of the tabs.
To clear the filter in a timetable select the Filter button and in the filter screen select Clear Filter. The Clear Tab button will only clear the filters you have selected on that tab.
To apply a filter enter the data you want to filter to and click OK. The most commonly used fields are found here:
- Basic – Filter Department, Course and Lecturer
- More – Filter Building, Room, Weeks, and Event Type (ONLIVE, etc.)
- Requests – Filter Event Status, Requested Room Type (LOC, CTT) and Un-roomed
- Bookings – Filter Contacts and Details
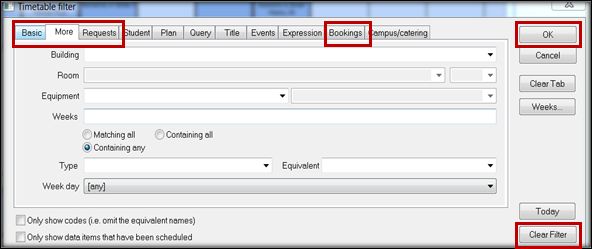
If you Clear Filter and then click the OK button you will filter to ‘All timetable data’ which will display the entire University timetable in a single window. This will take a long time to load. The upgraded version of CMIS that we are now running will warn you if you have nothing in the filter.
Apply a Filter - Event List
Remember there is a second filter in the timetable. If the events are showing in the graphical view but are not listed in the Event List, right click in that area and select Column > Filter > Clear Filter. In other areas within CMIS you can use the same method of right clicking on the list of data to access the filter options.
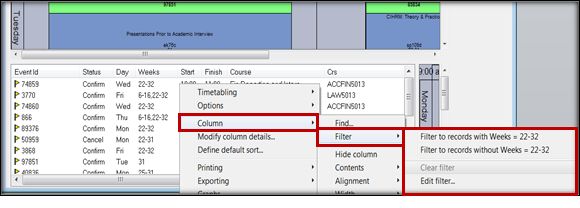
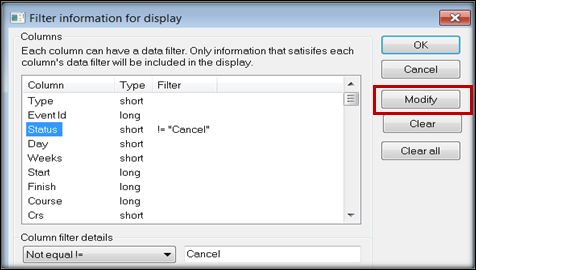
In Edit Filter you will be able to enter filter criteria. Select the field you want to filter on and use the dropdowns and text box to create a filter criteria, for example 'Not equal != Cancel' to remove events with the status Cancel.
When filter using the Greater or Less than arguments, use the options that start with a hash symbol, i.e. '# Less than'.
Remember to click Modify to apply each change you make.