

Moodle Enhancements Guide
This page provides an accessible version of training documentation for the Assessment and Feedback project.
The project looks to enhance the current Moodle offering, by creating additional plug-ins and giving students a new Dashboard to consolidate information into a single place to view assessment and feedback information.
The content below focuses on Moodle Enhancements: Assessment & Marking.
When accessing Moodle, we recommend using Firefox, Google Chrome or Microsoft Edge.
Please note that the steps laid out in this guide are only the ones relevant to enable the functionality of the new plug-ins. For any other guidance, refer to the the University’s How to Moodle guides.

What effect do the changes described in this guide have?
The Grade Capture and Aggregation Tool and the Student Dashboard work using information stored in course pages and assessments on Moodle. In this guide, we will provide a clear definition of the minimum data entry required to set this up. Adopting this new set up also facilitates archiving of assessments, feedback, and grades, so that these remain available in one place to students throughout their UofG career.
Getting ready: Settings for course pages and the Student Dashboard
This section describes setting up Moodle pages correctly, so that the right data can feed into the Grade Capture and Aggregation Tool and Student Dashboard.
- Course page setup can remain as it is at present, e.g. for Scottish Literature there is a single Course Page for Honours Assessments; for other subjects there is a Course Page for each course, which students from one or more Programmes might access, on which are stored course materials, reading lists, assessments, announcements, etc.
- Course format can remain as it is at present, e.g. Topics, Grid, Weekly.
- It can be helpful, although is not necessary, to include the academic year e.g. ‘2018/19’ in the name of each course page.
- The course start and end dates must be set, to enable identification of ‘active’ versus ‘past’ courses on the Student Dashboard.
You can undertake these activities at any point throughout the academic year, although it might be convenient for you to do so before the course starts.
Using a single Moodle page for all assessments
Note: While the approach described here might benefit you, it is not a prerequisite for the correct functioning of the Grade Capture and Aggregation Tool (GCAT). You can continue to set up your assessments for a course on that course’s Moodle page, or elsewhere, and still work with GCAT.
One approach to setting up course pages is to have a single Moodle page for assessments that exists alongside Moodle pages for each course. You could have a single Moodle page for all assessments on a programme, or for assessments at a particular level or levels. All students on that programme or level would have access to this page, although you can use groups and groupings to ensure students only access areas on the page relevant to them.
This approach means that information accompanying assessments, e.g. assessment guidelines and procedures, guidance on Good Cause claims, only needs to be entered once for each programme or level. It is also particularly useful for archiving, if you want to store assessments and related information for every year together in one place.
For example, the Moodle course page Scottish Literature Honours Assessment 2020-21 contains Topics which contain all the assessments for the courses Textual Editing SCOTLIT4029, Robert Burns SCOTLIT4030, and Alternative Renaissances SCOLIT4024. Materials such as lecture recordings, reading lists, etc. for these courses are held within separate Moodle course pages.

Recommended and required settings for Moodle pages
The steps below outline how to set up a Moodle page in order for GCAT and the Student Dashboard to function correctly. It is indicated throughout whether the setting described is a requirement or a recommendation. You can continue to use all other settings not mentioned in this guide as before.
- Course full name – enter the name of the new page
- It can be helpful for archiving purposes, although it is not a requirement, to include the academic year (e.g. “Test Course Assessments Academic Year 2021-22”, “Test Course 2021-22”.)
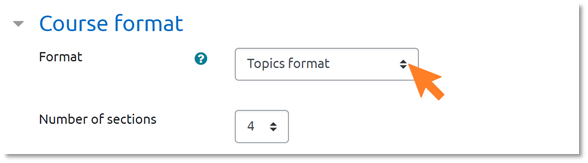
- Course format – expand menu
- Format - select your preferred page format
- In these guides, we are using the ‘Topics’ format. This is not a prerequisite for the correct functioning of any of the plug-ins. The Student Dashboard and GCAT will function correctly with course information presented in ‘Topics’, ‘Grid’, ‘Collapsed Grid’, and ‘Weekly’ format.
- In these guides, we are using the ‘Topics’ format. This is not a prerequisite for the correct functioning of any of the plug-ins. The Student Dashboard and GCAT will function correctly with course information presented in ‘Topics’, ‘Grid’, ‘Collapsed Grid’, and ‘Weekly’ format.
- Groups - expand the menu
- Group mode – select ‘Separate groups’
- We will be using groups to restrict access to certain assessments (e.g. if it is for students on one course only, or a resit), so must choose ‘Separate groups’ or ‘Visible groups’ here.
- Force group mode – select ‘Yes’
- This setting is not a requirement, but by choosing ‘Yes’, the setting you chose for ‘Group mode’ will be applied to all activities. In our example, that means that all activities on your Moodle page will have use the ‘Separate groups’ mode.

- Click ‘Save and return’

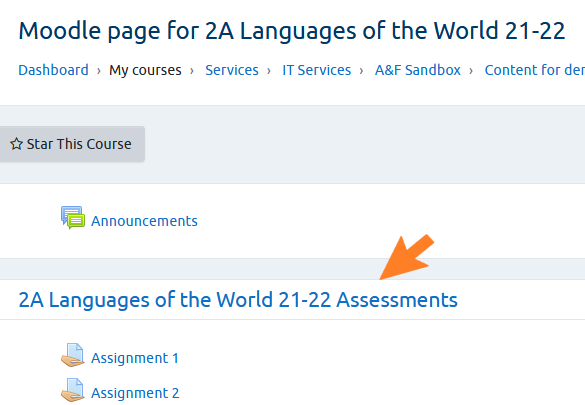
The information in the ‘Course’ column on the Student Dashboard is drawn from the name of the section in which the assessments are stored, and not from the course name or title of the Moodle page. For this reason, it is very important that the section of your Moodle page in which your assessments are kept contains the name of the course, the course code, or some other clear way of identifying the course. Where possible, it may be useful to keep all your assessments together, in one section of the Moodle page, which has the same name as the name of the course.
Switching on the Student Dashboard
Users with Manager access to a course can view a cogwheel on the top right of the Grade Capture & Aggregation Tool. On the dropdown menu there is an item “Switch on assessments on Student Dashboard”. When this item is selected, students will then be able to view their assessment details on the Student Dashboard.
Assessments set up on this page can be displayed on the Student Dashboard - to switch this on:
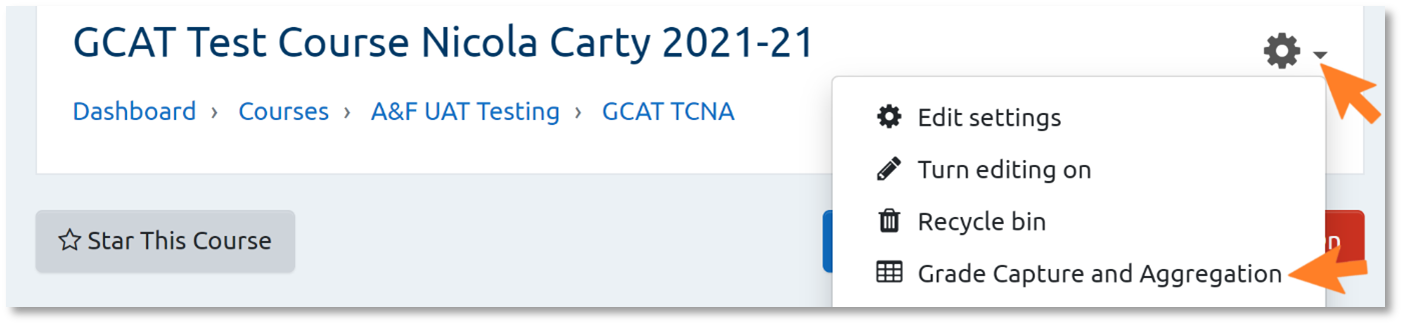
- Click the right-hand side settings cogwheel on the Moodle course page
- Select ‘Grade Capture and Aggregation’
- The menu that appears from the cogwheel may be quite long, and ‘Grade Capture and Aggregation’ will be towards the bottom of this
- Select the settings cogwheel in GCAT
- Select ‘Switch on display of assessments on student dashboard’
- If this is enabled the dropdown menu will show ‘Switch off display of assessments on student dashboard’
- Note: Only staff who have Manager permissions on Moodle will see both items in the dropdown menu, i.e. ‘Hide student identities’ and ‘Switch on display of assessments on student dashboard’

Note: Assessments within a course will only display if the course is enabled in GCAT and if it has assessments that are assigned to the student in question.
Using Gradebook to set up grade categories for assessments
Assessments will be categorised under the grade categories 'Formative' and 'Summative'. Including them as part of the assessment name (e.g. SCOTLIT4030 Formative) will ensure that assessments are correctly grouped to indicate weighting and ensure that the assessment type is correctly picked up by the Student Dashboard.
You will need to set up a summative and formative category for each course represented on the Moodle page, or each cohort of students. This will make it easier to manage the grades of students from the different cohorts. So, if you are using a single assessment page,you would have different categories for the assessments on each course, e.g. ‘Summative SCOTLIT4029’ and ‘Summative SCOTLIT4030’.
If the students accessing a Moodle page are doing the same assessment but this is weighted differently by cohort, e.g. 100% for PGT, 75% for UG, then you must use different grade categories for each cohort, so that the correct weighting is used in course grade aggregation. You can find guidance on adding weightings to individual assessments in the section Adding weightings to summative assessments.
All summative assessments on a given course must add up to 1.0 which represents 100% weighting. All formative assessments must have a weighting of zero to ensure that they are bypassed by the Grade Capture and Aggregation Tool (GCAT) but stay visible for auditing purposes.
Once an assessment is graded, the weightings in Moodle Gradebook are applied and the data subsequently feeds into the GCAT.
A note on Gradebook
The information GCAT uses to aggregate grades is pulled from Gradebook in Moodle. Whatever your previous experience with Gradebook, we will describe here everything you need to do to ensure the correct functioning of GCAT and the Student Dashboard. Any other uses of Gradebook that are not described in this manual will not be required for GCAT and the Student Dashboard, and thus their use will be at the discretion of different areas.
Setting up grade categories
Comparable to a file storage system, Gradebook offers three levels of grade category for storing assessments and aggregating assessment grades.
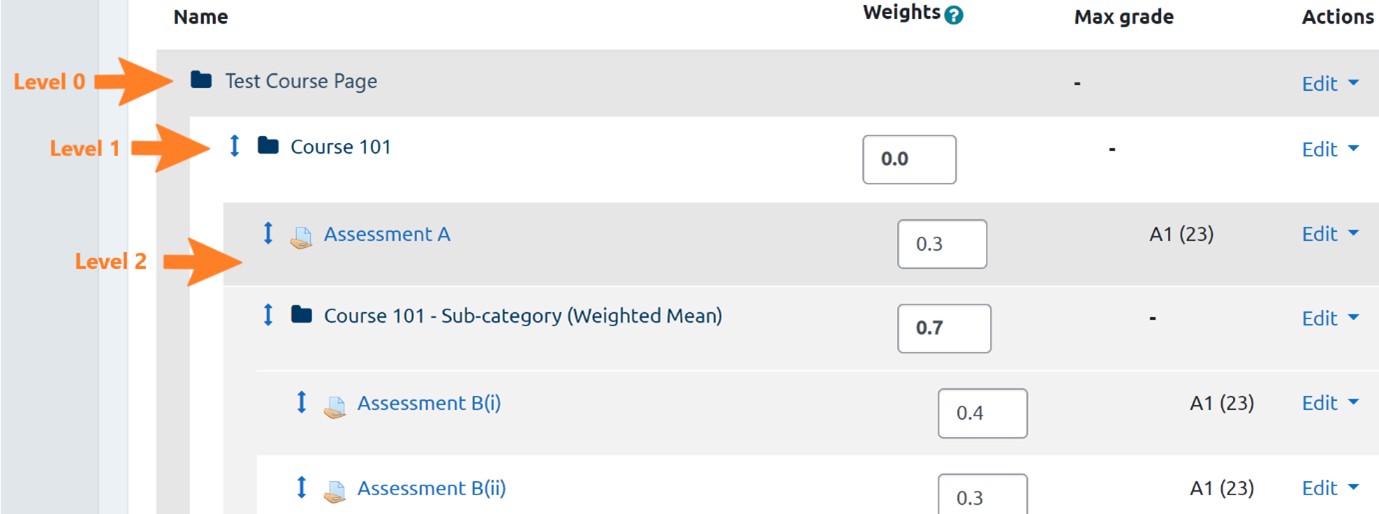
- Level 0 – this is the course page level
- Level 1 – this is the grade category for a single course or single course assessments
- It is used to define the formative or the summative assessments for a course
- It stores assessments and/or sub-categories which all relate to a single course. These assessments and sub-categories are used to calculate the aggregated course grade in GCAT
- Level 2 – this is a sub-category within a single course.
- It is used when the grades of assessments and/or components of assessments are to be compared and / or aggregated to create a single assessment grade.
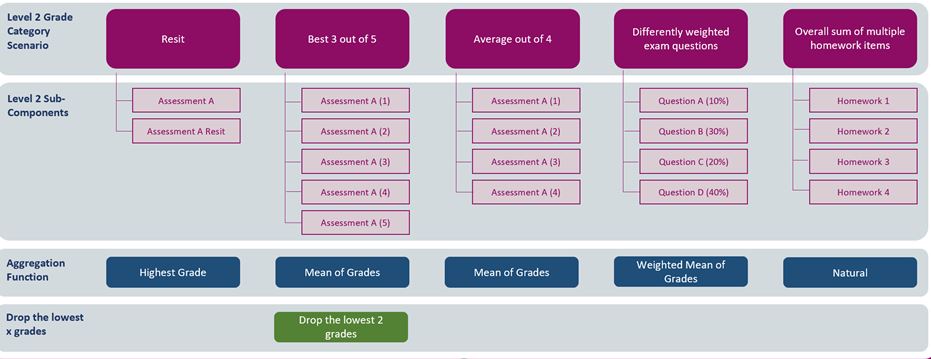
- Example use cases for this are:
- to compare original and resit assessment grades; to aggregate grades for exam questions to generate a grade for an exam; or to combine the best 3 out of 5 available grades for lab assessments to create a single grade
Formative and summative grade categories
It is important to use the words Formative or Summative in the names of your Level 1 grade categories because these are the labels that will appear in the Student Dashboard. They can be spelled with or without capital letters, but misspelling or failure to include these will mean that information about assessment type and weighting will not appear on the Student Dashboard.
Note that GCAT does not accept grade categories lower than Level 2.
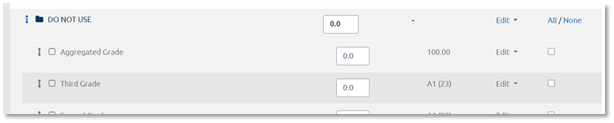
Automatic generation of additional rows in Gradebook
When grades are imported into GCAT, this automatically creates additional rows of data in the Gradebook setup under a category of “DO NOT USE”. This does not require any actions. It is where GCAT stores its data and should be ignored by the user.
Setting up grade categories and their weightings
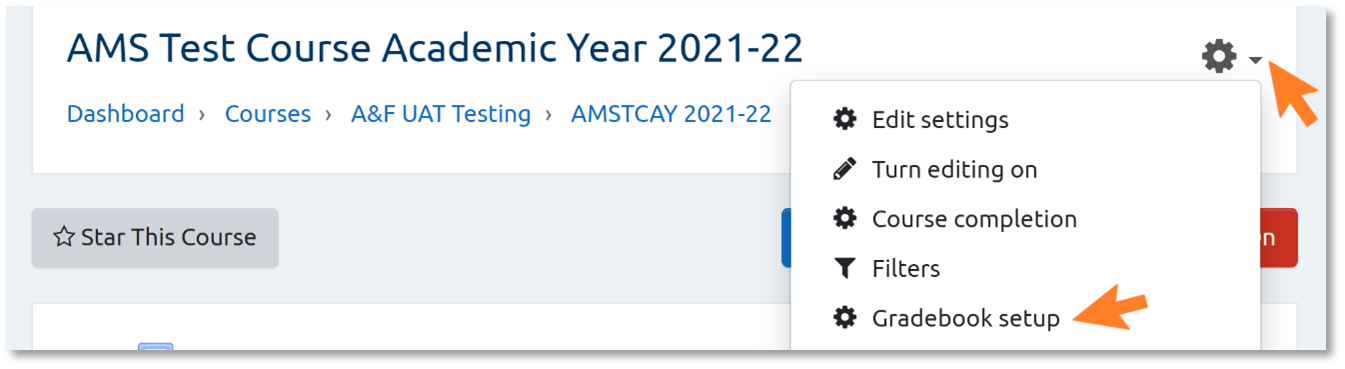
- From your Moodle page, select Gradebook setup from the menu in the settings cogwheel (top right).
- Scorll to the bottom of the screen and select 'Add category'

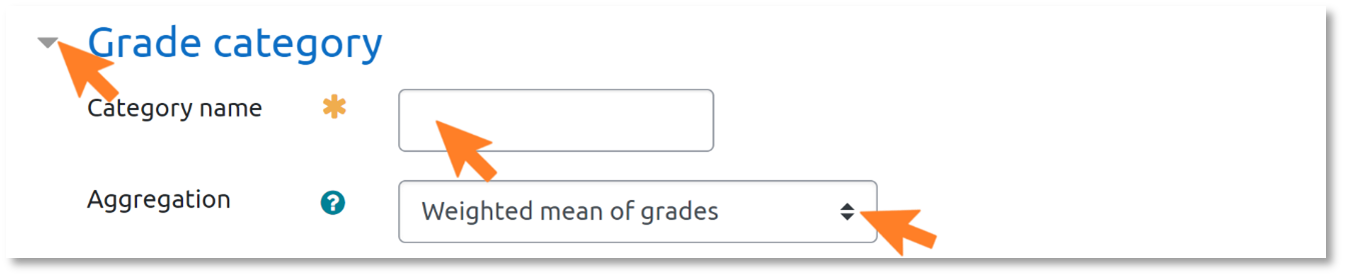
- Grade category - expand the menu
- Category name - add the category name
- It can be helpful, although is not a requirement, particularly if you are using a single assessment page, to include the course short name and code in the name, e.g. SCOTLIT4030 Formative
- You must include the word formative or summative in your Level 1 grade category names e.g. SCOTLIT4030 Formative
- Aggregation - select the desired aggregation type from the drop-down menu
- Level 1 grade categories must be aggregated using weighted mean of grades
- Other aggregation types can be used with Level 2 grade categories. For more information on these, see the section 'Setting up a Level 2 grade category and Components' below
- Category total - expand the menu
- Note: The settings within 'Gradebook settings' > 'Category total' for 'Grade type' and 'Scale' have no effect on GCAT or the Student Dashboard. These settings will affect how information is displayed in Gradebook, so to avoid confusion we recommend using UofG 22-Point Scale or UofG 22 Point Scale with numeric values. There are no other consequences, however, for the use of the plug-ins.
- Grade type - select the desired grade type from the dropdown menu
- Scale - select the marking scale you will be using

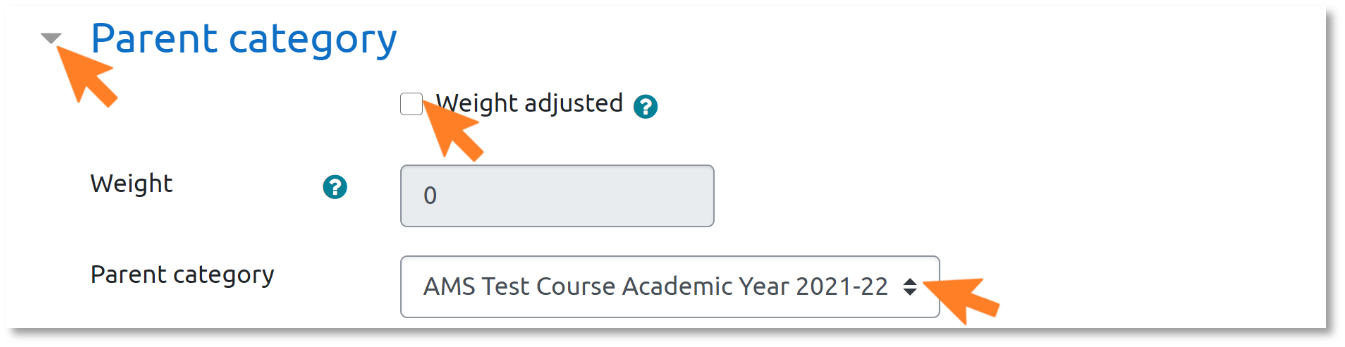
- Weight – 1 for summative categories, 0 for formative categories
- If you do not see the ‘Weight adjusted’ box or ‘Weight’ field, move on to Parent category, described below
- You will add the specific weightings for each individual assessment later on - please see the Adding weightings to summative assessments section.

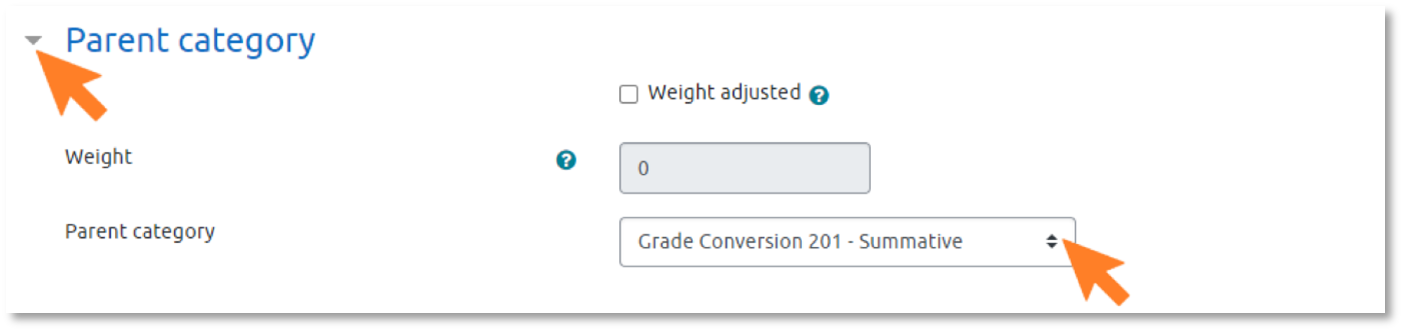
- Parent category - expand the menu
- Note that this function is not available when setting up your first assessment category but it will be for any further assessments. If you are setting up your first category, please disregard the steps described here for ‘Parent category’.
- Weight adjusted - tick box
- Parent category
- For assessments in the Level 1 category - ensure the name of your course is selected
- For assessments in the Level 2 category - ensure that the Level 1 category is selected
- Click 'save changes'

Note: If you have chosen ‘UofG 22-Point Scale’ or ‘UofG 22 Point Scale (with numeric values)’, Max Grade will be displayed in Gradebook setup as ‘A1 (23)’ or ‘A1:22 (23)’. This is due to the code in core Moodle and cannot be changed. However, it does not affect the use of the 22-point scale as it is intended. Once graded, assessments will be reflected in the grader report which can be accessed via gradebook setup in the course page cogwheel menu.
Setting up a Level 2 grade category and components
To set up a Level 2 grade category follow the instructions for creating a new category in the Setting up Grade Categories and their Weightings section above.
- Category name – add the category name
- The Level 2 category name should be the same as the assessment which sits within it, e.g. Essay 1, Summer Exam. This is because this is the name that will appear on the Student Dashboard. This will also make it easier to identify the assessment in GCAT.

- The names of the individual components are displayed on the Dashboard by clicking the assessment name, i.e. the name of the Level 2 Grade Category.
- Select the aggregation method to be used by GCAT for the grade aggregation in the Level 2 grade category. Choose from the following
|
Function |
Description |
Examples scenarios for using this function |
|
Mean of grades |
Adds all the grades in the sub-category and divides by the number of assessments (A1 + A3)/2 |
|
|
Weighted mean of grades |
Multiplies each assessment grade by the weighting of the assessment towards the category; sums these together; divides by the sum of the weightings ((A1*0.5)+(A3*0.5))/(0.5 + 0.5) |
Generating an overall exam grade made up of differently weighted questions.
|
|
Median of grades |
Orders all grades, selects the middle grade. If there are two middle grades, the average of the two is taken A5, B1, A1, A3 -> A1, A2, A5, B1 -> A4
|
|
|
Highest grade |
Selects the highest grade available out of the grades in the category B1, B3, A3, A5 -> A3 |
Comparing original and resit assessment results. |
|
Mode of grades |
Selects the most common grade available out of the grades in the category B1, A2, A3, A2, A4 -> A2 If there are two modes, the highest of the two is selected |
|
|
Natural |
Adds the grades together. N.B Can only be used with Points grades 18, 30, 32, 10 = 90 |
Useful if you wish to produce a total numeric score for multiple components before converting to a grade. |

- In scenarios where lower grades are to be excluded, enter the amount at ‘Drop the lowest’
- This will drop the lowest x grades and perform the aggregation function without these grades.
- Grades which are ‘MV’, ‘NS’, or ‘No grade recorded’ in GCAT will be dropped as the lowest grades

- Set-up and assign the assessments or components of assessment for this Level 2 grade category to this grade category as outlined in the Setting up an assessment section.
- Category total – expand the menu
- Note: The settings within 'Gradebook settings' > 'Category total' for ‘Grade type’ and ‘Scale’ have no effect on GCAT or the Student Dashboard. However, these settings will affect how information is displayed in Gradebook. Thus, to avoid confusion, we recommend using UofG 22-Point Scale or UofG 22 Point Scale with numeric values. There are no consequences for grading or for the use of the plug-ins.
- Parent Category - select the Level 1 grade category
- Weight adjusted – tick box
- Weight – add the total weight of the assessment (i.e. not the component parts) in the Level 2 grade category
Setting up Groups and Groupings
Groupings are collections of groups. A given grouping can contain any number of groups. They can be used if you have settings that you wish to apply to some, but not all, groups on a course page. If you are using a single assessment page, it is crucial to use groups and groupings.
Groups and groupings may also be beneficial where students on different courses share one Moodle course page, e.g. PGT and UG students both taking a Level 4 course.
In addition to the information here, there is guidance on how to use groups and groupings available on How to Moodle, and on the Learning Innovation Support Unit’s recorded upskilling sessions.
Groups
You must use groups to restrict access to assessments when these are being undertaken as resits, or in a later exam diet to other students on the course. Otherwise, the use of GCAT and the Student Dashboard does not depend on any particular settings for groups.
To set up a group:
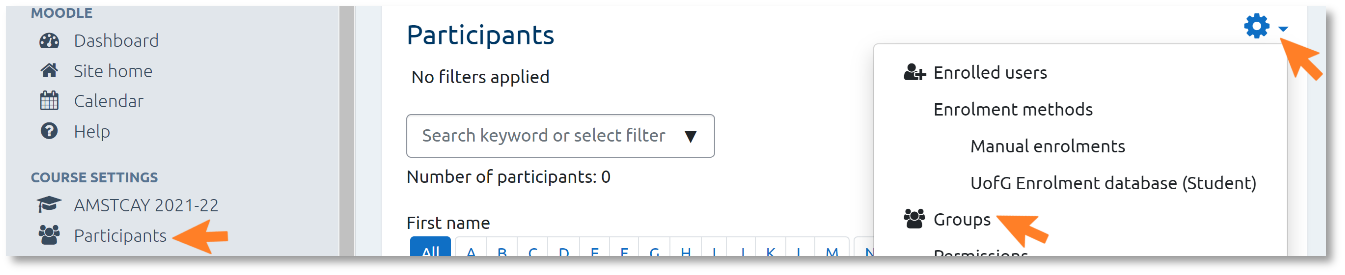
- Click 'participants' in the left hand menu
- Select Groups in the settings cogwheel menu (top right)
- Scroll down and select 'Create group'

- Group name - enter a name for your group

- Save changes

- Click on the name of the group you have created
- Add/remove users - add from potential members to group members

- Click 'Back to groups'

To restrict access to areas on a Moodle page to certain groups only:
- Navigate to your course via the left hand side Course Settings menu
- Click 'turn editing on'

- Click 'edit'
- Select 'edit topic'

- Restrict access - expand the menu
- Restrict access - select 'add restriction'

- Select 'group'

- Group - select desired 'Course Code' by which the group can be identified
- Click 'save changes'

For further guidance on using Groups on Moodle, please refer to How to Moodle and the Learning Innovation Support Unit's recorded upskilling sessions.
Groupings
Groupings can be used if you want students who access the same Moodle page to complete different assessment activities. They can also be used if students are to complete the same assessment activity, but this activity is weighted differently for different (groups of) students.
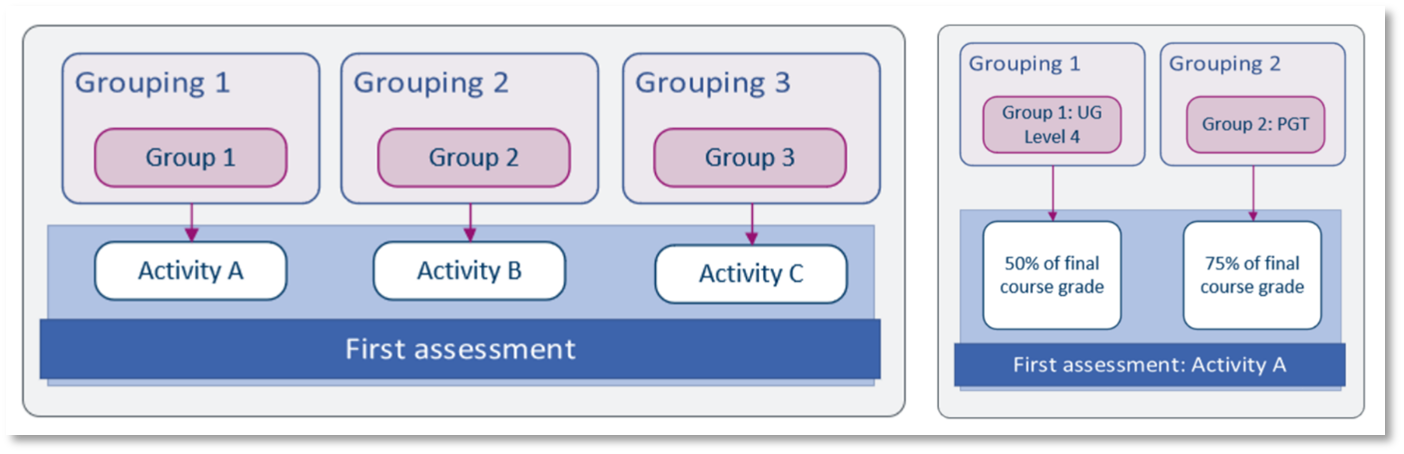
A further use of groupings is to make sure that only those students who have completed a given assessment appear in GCAT for that assessment. For example, if 10 students in a class of 100 complete a resit assessment, you may prefer to just see the grades of those 10 students. Alternatively, you would also see ‘Pending information’ beside the name of each student who did not take the resit assessment, as there would be no grade available for them.
In addition to the information here, there is guidance on how to use groups and groupings available on How to Moodle, and on the Learning Innovation Support Unit’s recorded upskilling sessions.
To add groups to a grouping:
- Go to the Settings cogwheel on your course page and click ‘More’ (last option in dropdown menu)

- Select Users

- Select Groups

- Select Groupings

If necessary, create a new grouping:
- Select ‘Create grouping’

- Add a name for your grouping
- If the grouping is to contain only one group, then you can give the group and grouping the same name.
- If the grouping is to contain more than one group, choose a descriptive name for the grouping, e.g. “Textual Editing and Robert Burns”, or “Grouping for Essay assignment”

- Click ‘Save changes’

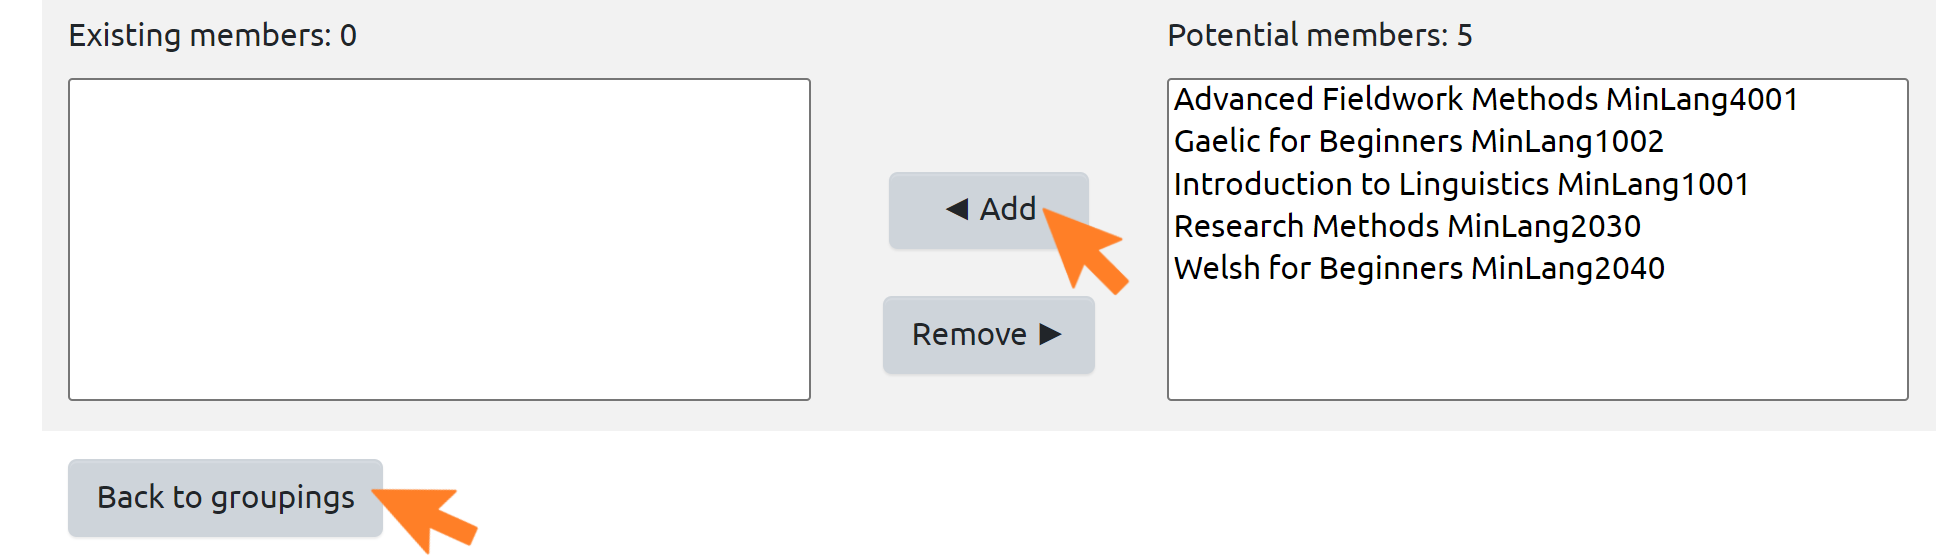
- Click the person icon in under the Edit column for the group you have just created

- Click ‘Add’ to add from Potential members to Existing members
- Alternatively click ‘Remove’ to remove existing members
- Click ‘Back to groupings’
Assessments for students in each grouping should be placed in separate grade categories. In this way, GCAT will be able to aggregate grades correctly for students on each course. If students are taking the same assessment but it is weighted differently depending on their grouping, you can duplicate that assessment, remembering to choose the appropriate grade category for each grouping in the assessment settings. For guidance on duplicating an assessment, see Setting up an Activity.
Setting up an Activity
Once your Moodle page has been set up, you can add activities to the different sections. The Grade Capture and Aggregation Tool (GCAT) currently works with with the following Moodle activities: Assignment, Forum, Quiz, and Workshop. These activities can all be used summatively or formatively.
When setting up an activity for assessment, it is important to ensure that the correct start and end dates are entered. Otherwise, the assessment will not display the correct status on the Student Dashboard.
Provisional results from Forum, Quiz, and Workshop activities will automatically display on the Student Dashboard once they are available in Gradebook. Provisional results from Assignment activities can be held back from the Dashboard until you release them in GCAT (see Releasing Results to Students in the GCAT guide. However, you must have workflow enabled (see 'Setting up an Assignment' below) to make use of this functionality to hold grades back. Otherwise, they will display on the Student Dashboard as soon as they are available in Gradebook.
To add an activity:
- Navigate to your course via the left-hand side course settings menu
- Click ‘Turn Editing on

- Scroll down to the relevant section and click 'Add an Activity or Resource'

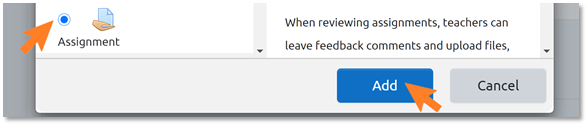
- Select Assignment, Forum, Quiz, or Workshop from the menu, depending on the assessment type you require.
- Click ‘Add’
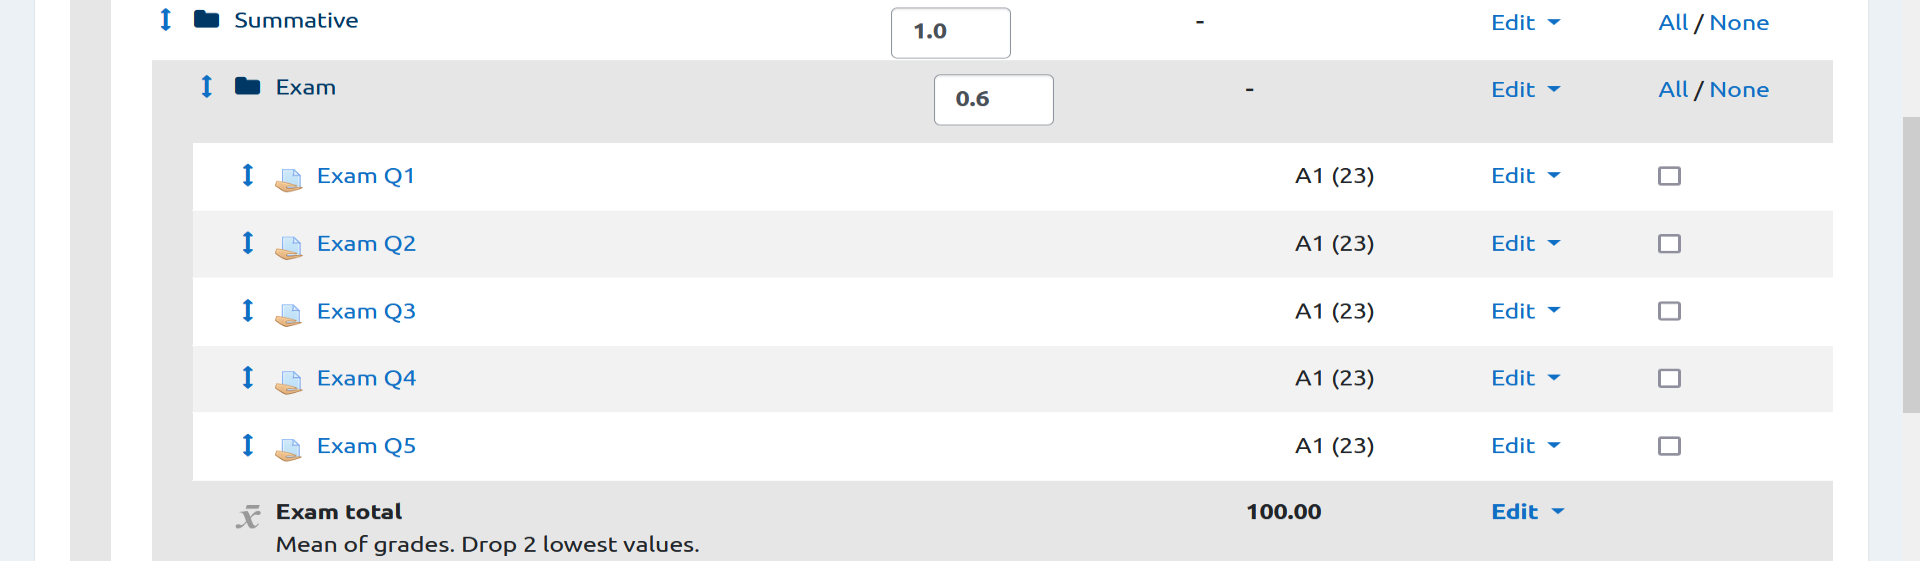
If you are using a Level 2 grade category for a resit, an assessment with multiple components, or other type of aggregated assessment, then each component must be added as an individual activity.
For example, an exam which has five questions that are aggregated to give a final grade for that exam would be set up as five different activities. These could then be labelled Exam Question 1, Exam Question 2, and so on. A course grade based on the aggregated mean of the results of 10 weekly homework activities would be set up as 10 different activities. These could then be labelled Week 1, Week 2, and so on.
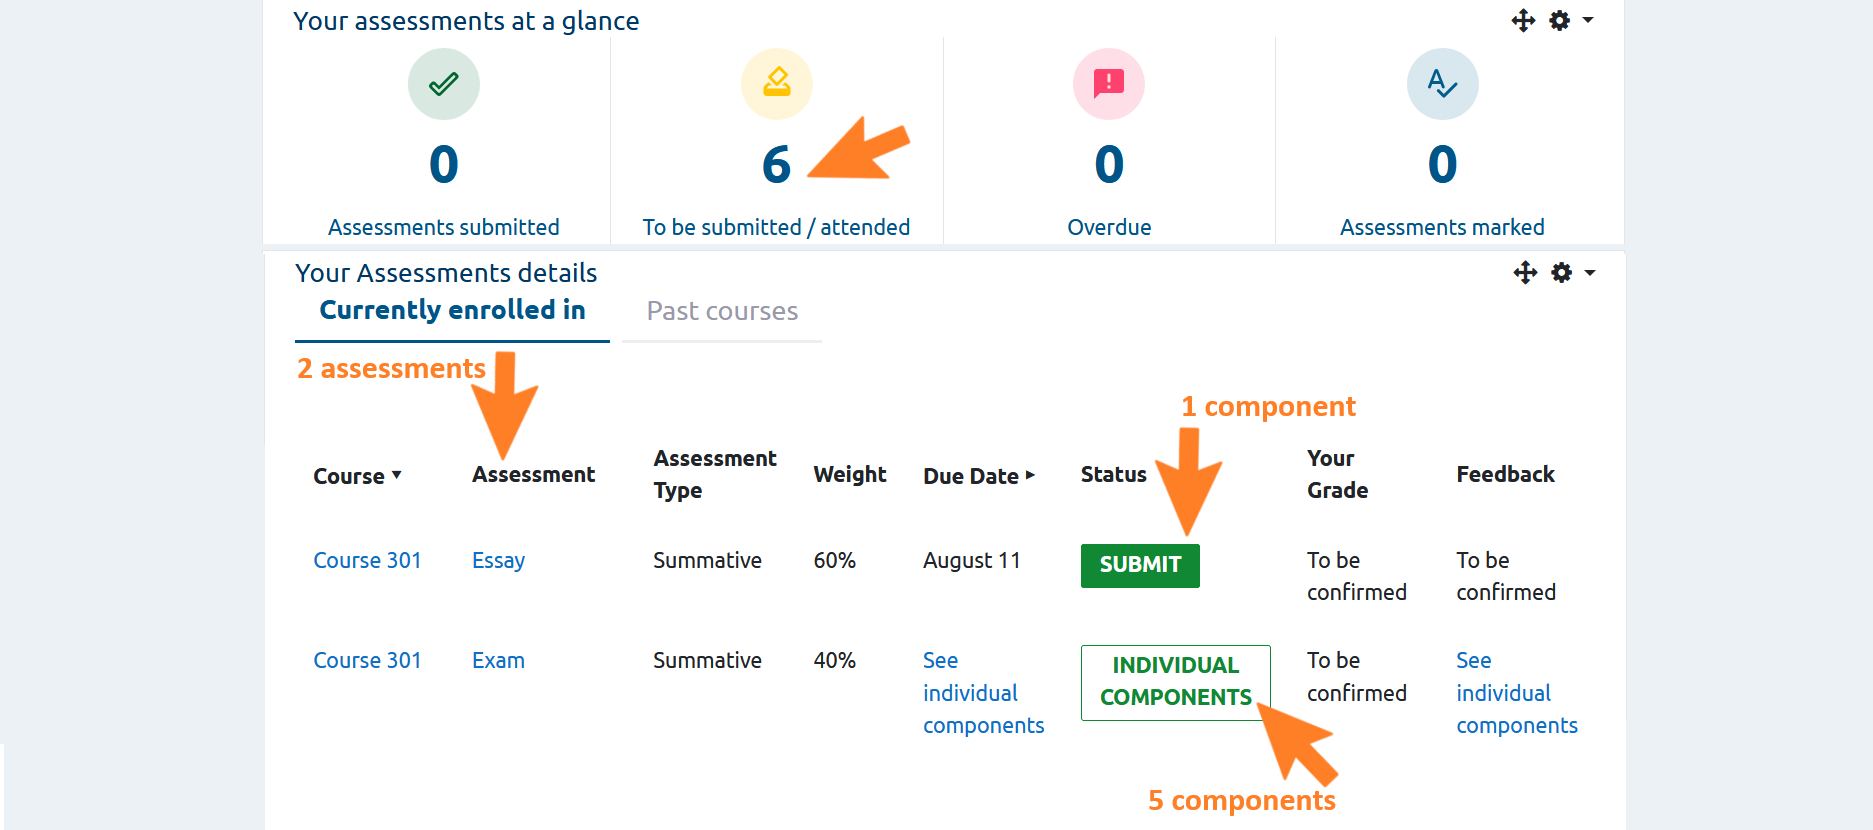
Note: Because components are set up as individual activities, they will be counted in the ‘Your assessments at a glance’ section of the Student Dashboard as individual assessments. The ‘Your Assessments details’ section will recognise that these individual components are part of one larger assessment.
Setting up an Assignment
Please note that the steps outlined here are only the ones required to enable the correct functioning of GCAT and the Student Dashboard. For all further settings, please follow your previous practice.
- Follow the guidance above in Setting up an Activity to add a new activity.
- Make sure to include information in the Assignment name that will make it easy to identify on the Student Dashboard or in GCAT, e.g. Textual Editing Essay for an assignment on the course Textual Editing SCOTLIT4029
- Availability – expand the menu
- Enable and set the ‘Allow submissions from’ date
- Enable and set the ‘Due date’

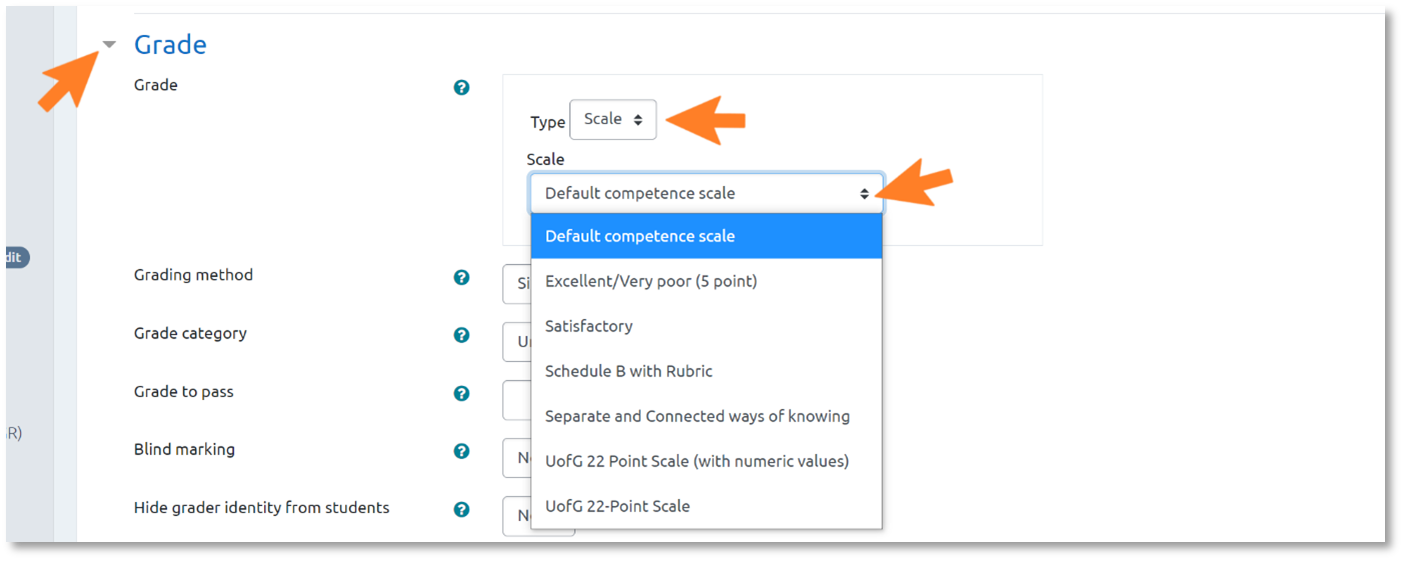
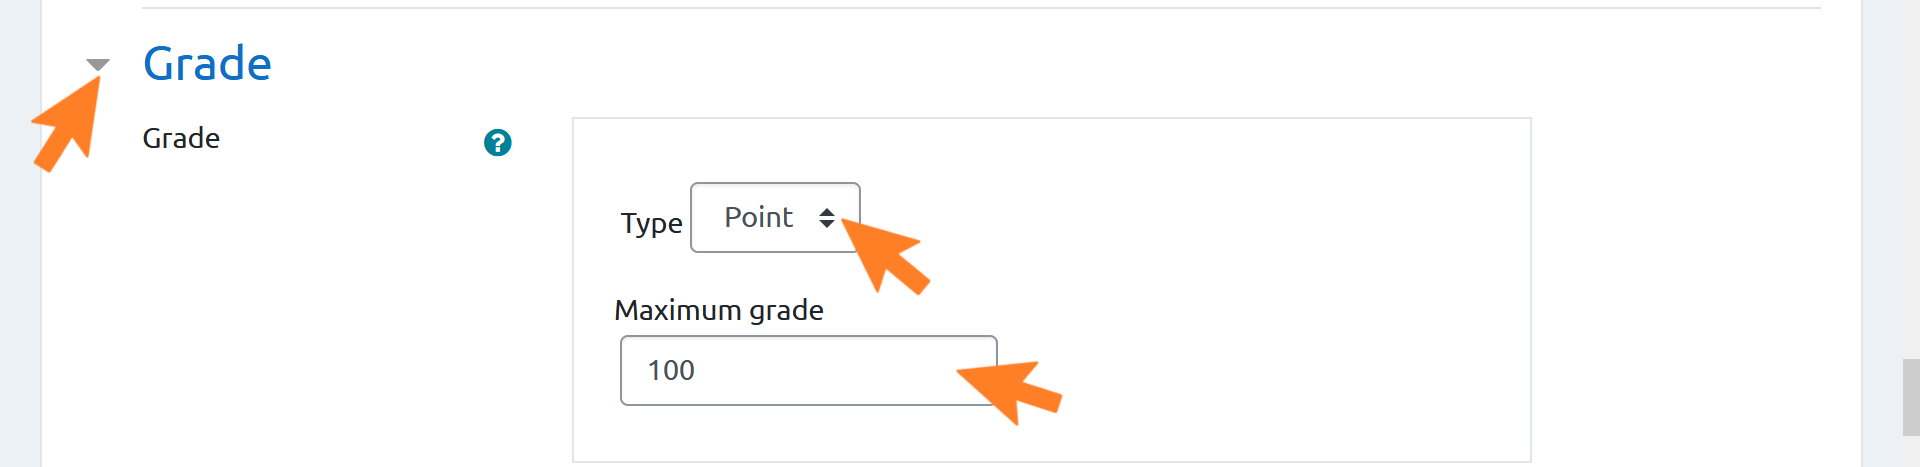
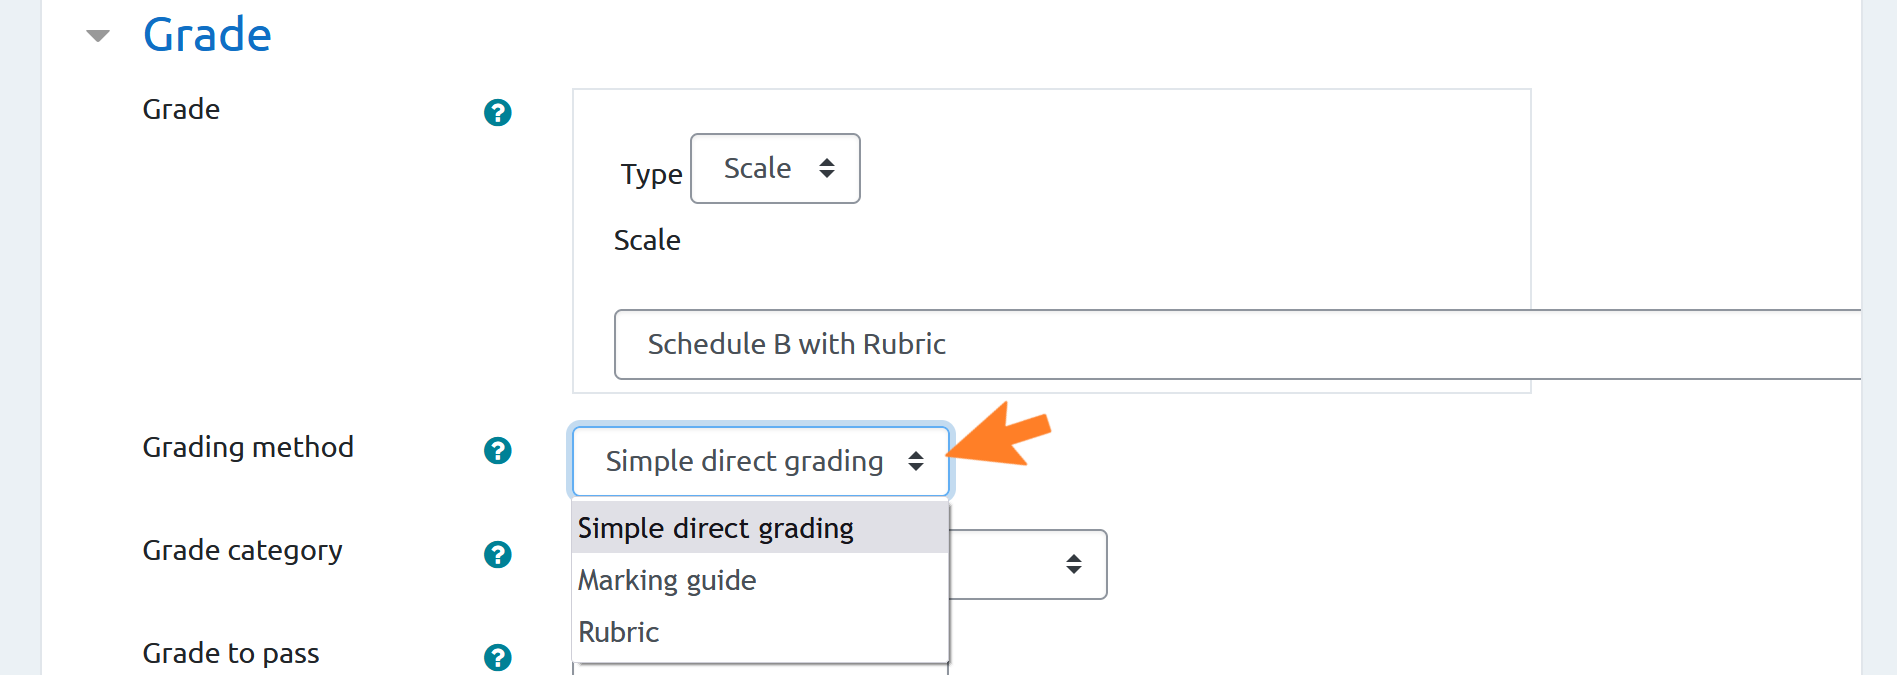
- Grade - expand the menu
- Type - select 'Scale' or ‘Point’, according to the grade type you will be using
- Scale - select the scale which you are marking your Assessment
- If to be marked in Schedule A - select ‘UofG 22-Point Scale’ or ‘UofG 22 Point Scale with numeric values’
- If to be marked in Schedule B – select ‘Schedule B with Rubric’
- Do not use the Scale grade type if you intend to mark using Turnitin Feedback Studio
- Scale - select the scale which you are marking your Assessment
- Type
- Point - enter the maximum grade in points that a student can receive for this activity
- You cannot set a maximum value above 100
- If you are marking using Turnitin Feedback Studio, you must use points. The maximum value should be 22
- Point - enter the maximum grade in points that a student can receive for this activity
- Point
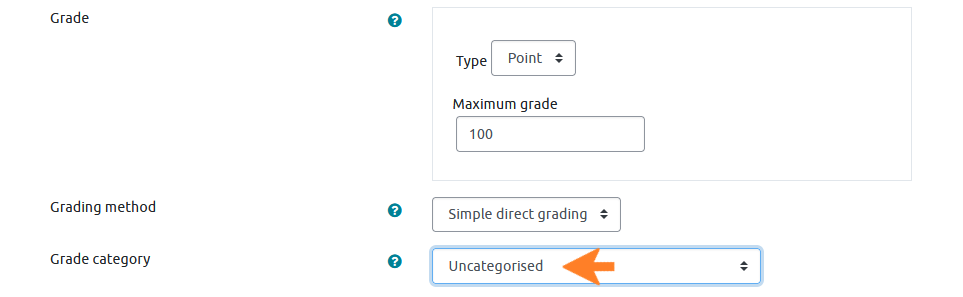
- Grade category - the grade category relevant to this assessment

- Use marking workflow – leave as the default setting, ‘Yes’
- Marking workflow must be set to ‘Yes’ if you wish to hide grades from students until you release them using GCAT (see the Releasing Results to Students section of the GCAT Guide)
- If marking workflow is set to ‘No’, provisional grades from Assignments will be displayed on the Student Dashboard as soon as they have been entered into Moodle

- Save and display

For a reminder on how to further set up an assessment on a given grading scale, please refer to the Moodle Assignment Settings Guide. Please also ensure that your grade categories and weightings for assessments have been set up correctly (see Using Gradebook to set up grade categories for assessments.
Setting up an in-name only Assignment for offline assessments, oral exams, OSCEs, written exams, and other activities
Some assessments, such as exams, may take place offline. In these cases, grades will still need to be input to Moodle so that they can display on the Student Dashboard. To do this, it is necessary to set up up an in-name only Assignment activity and add grades to Moodle (for guidance on adding grades, see Marking and Recording Grades. Once the grades have been entered into Moodle, it will be possible to import them to GCAT and aggregate them as with any other assessment.
If the assessment will be set up for offline submission, please follow the steps outlined above in Setting up an Assignment and make sure that the right settings are selected depending on the type of offline assessment that you are setting up, e.g. disable Turnitin for exams.
Additionally, within the assignment set up space, ensure the following:
- Submission types - untick 'All submission types'

- Students will be able to see this assessment on their Dashboard, including when it will take place, and grades and feedback once these are added. However, they will not be able to submit anything.

Draft Assignments for Turnitin Similarity Checking
In some areas, students are required, or encouraged, to submit a draft version of their assignments so these can be examined using the Turnitin Similarity Report.
Go through the steps described above in Setting up an Assignment.
- Make sure to include information in the Assignment name that will make it easy to identify on the Student Dashboard, e.g. Draft Textual Editing Essay, or Textual Editing for Turnitin Similarity Checking, for an assignment on the course Textual Editing SCOTLIT4029
- Configure the Assignment options as needed, until you reach Grade – Grade category
- Grade category – Uncategorised
- Continue to use your current settings for all other options
- Save and display

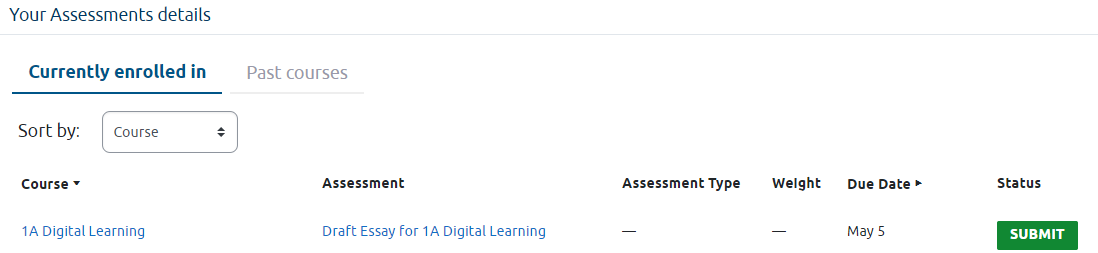
As this Assignment is not categorised as summative or formative, you do not need to add weightings or any other additional information. GCAT will not expect to receive any information from this Assignment. The Assignment will now display on the Student Dashboard as shown in the image, and students will be able to submit their draft as before. Please note that it is not possible to change or remove the due dates for grades and feedback.
Setting up a Forum
Please note that the steps outlined here are only the ones required to enable the correct functioning of GCAT and the Student Dashboard. For all further settings, please follow your previous practice.
- Follow the guidance above in Setting up an Activity to add a new Forum activity.
- Make sure to include information in the Forum name that will make it easy to identify on the Student Dashboard or in GCAT, e.g. Textual Editing Forum for a forum on the course Textual Editing SCOTLIT4029
- Availability – expand menu
- Enable and set Due date
- Enable and set Cut-off date

- Whole forum grading – expand menu
- Grade
- Type – select ‘Scale’ or ‘Point’, according to the grade type you will be using
- Scale – Select the scale against which you are marking your assessment
- If to be marked against Schedule A - select ‘UofG 22-Point Scale’ or ‘UofG 22 Point Scale with numeric values’
- If to be marked against Schedule B – select ‘Schedule B with Rubric’
- Scale – Select the scale against which you are marking your assessment

- Point – enter the maximum grade in points that a student can receive for this activity
- You cannot set a maximum value above 100

- Grade category – Select the grade category relevant to this assessment

Setting up a Quiz
Please note that the steps outlined here are only the ones required to enable the correct functioning of GCAT and the Student Dashboard. For all further settings, please follow your previous practice.
- Follow the guidance above for setting up an activity.
- Make sure to include information in the Quiz name that will make it easy to identify on the Student Dashboard or in GCAT, e.g. Textual Editing Quiz for a quiz on the course Textual Editing SCOTLIT4029
- Timing – expand the menu
- Enable and set date and time for Open the quiz
- Enable and set date and time for Close the quiz

- Grade – expand the menu
- Grade category – Select the grade category relevant to this assessment

Setting up a Workshop
Please note that the steps outlined here are only the ones required to enable the correct functioning of GCAT and the Student Dashboard. For all further settings, please follow your previous practice.
- Follow the guidance above for .
- Make sure to include information in the Workshop name that will make it easy to identify on the Student Dashboard or in GCAT, e.g. Textual Editing Workshop for a workshop activity on the course Textual Editing SCOTLIT4029
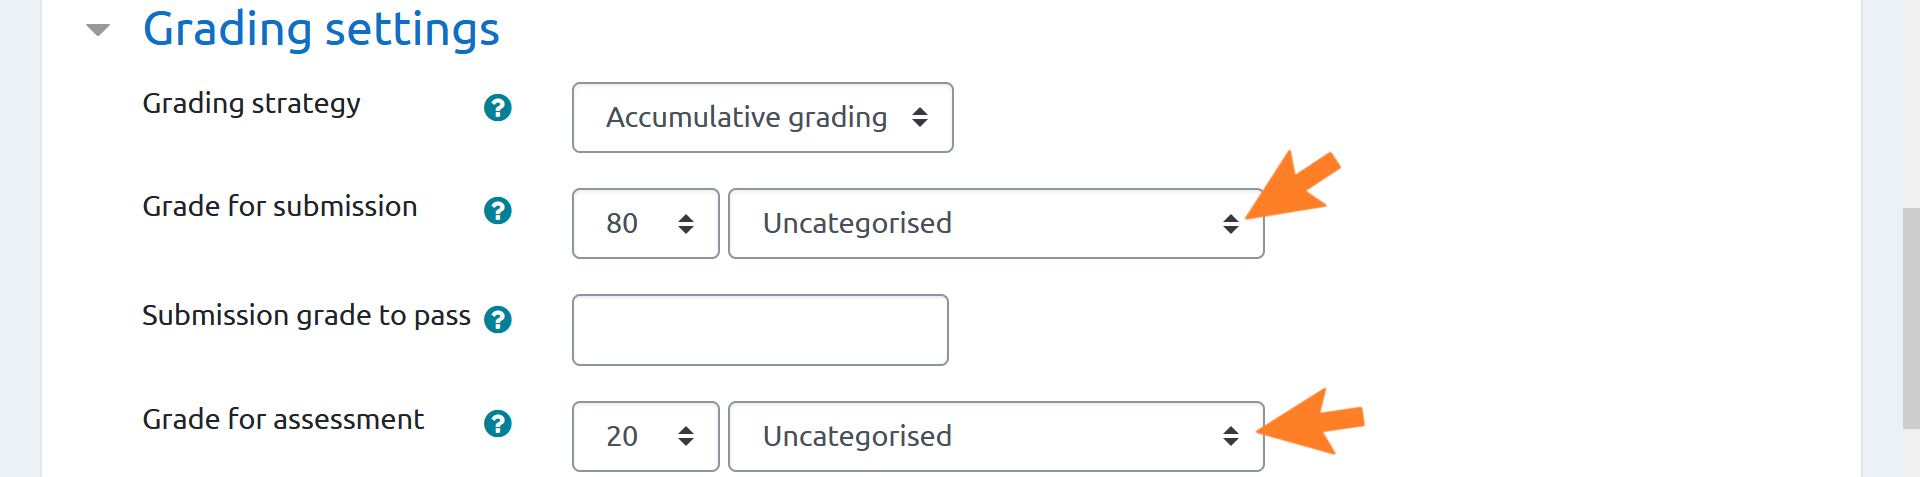
- Grading settings - expand menu
- Grade for submission – Select the grade category relevant to this assessment
- Grade for assessment – Select the grade category relevant to this assessment
- Availability – expand menu
- Enable and set all four dates

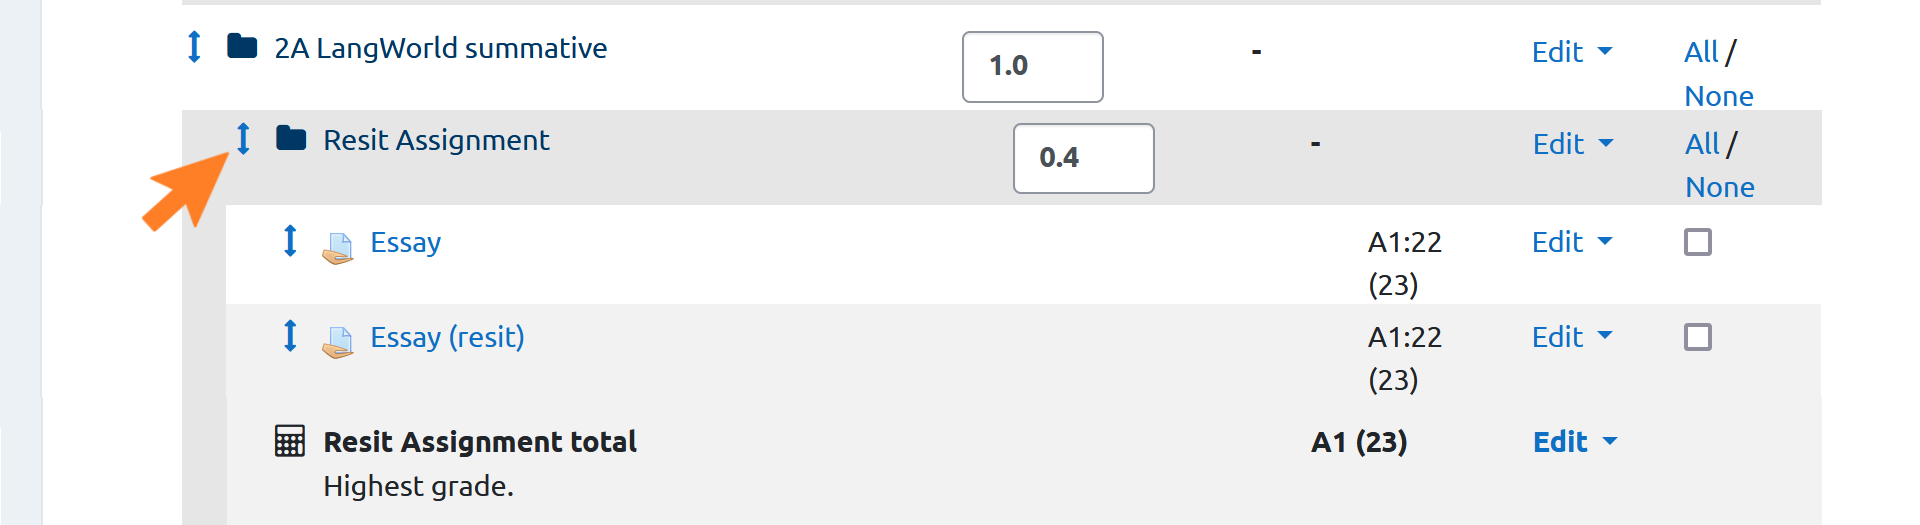
Setting up a Resit Assessment
GCAT can automatically compare the results of a first sitting and a resit, identify the highest grade, and incorporate this into the aggregated course grade. To enable this, place both the original and the resit assessment in a Level 2 grade category, with Highest grade as the aggregation type.

In addition, the following steps should be carried out within the resit assessment set up, to ensure that only students eligible for the resit assessment can take it:
- Restrict access – expand the menu
- Add restriction – click button
- Select ‘Group’
- Group – Select the group holding your resit students (see Setting up groups and groupings for guidance on setting up a group)
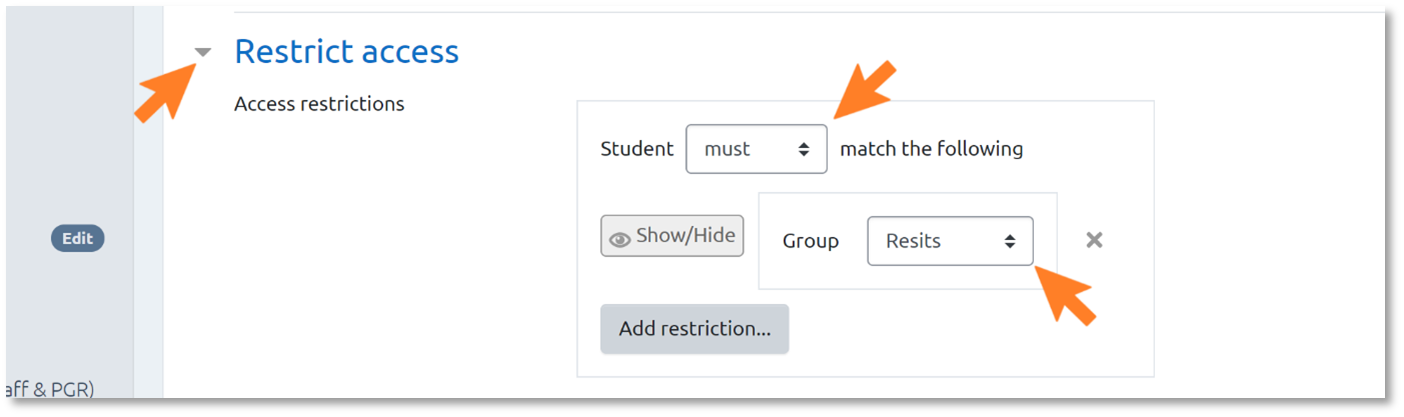
- Click – ‘Save and return to course’

Creating multiple versions of an assessment for students from different courses or programmes
If the students accessing your Moodle page are from different courses or programmes, it can be useful – although it is not a requirement – to have one version of the assessment for each cohort of students. Each version can then be set up in its own grade category. This is because when it comes to entering and aggregating grades, it will be easier to manage the grades of the students from different cohorts.
If the students are doing the same assessment but this is weighted differently by cohort, e.g. 100% for PGT, 75% for UG, then you must use one version of the assessment for each cohort. This is because the assessment for each cohort must be in a different grade category, so that the correct weighting is used in course grade aggregation.
To create multiple versions of the same assessment, set up the first version of the assessment, following the steps in Setting up an Activity. When you have done this:
- Go to the ‘Edit’ menu beside the assessment you want to duplicate
- Choose ‘Duplicate’
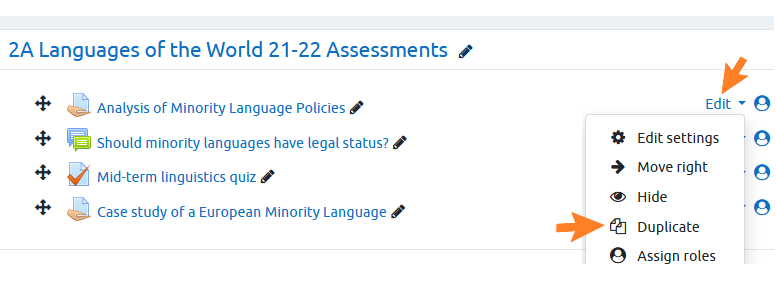
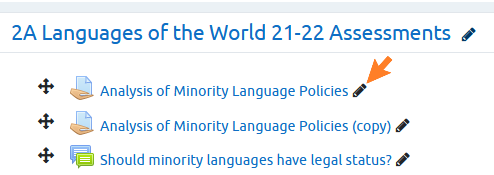
- The duplicated assessment will have the same name as the original, followed by ‘Copy’
- Click the pencil icon beside the assessment to edit the name
- Navigate to the settings for the new, duplicate assessment, and choose the appropriate grade category
- This should be different to the grade category of the original assessment
- Adjust the weighting of the duplicate assessment, if required (see Adding weightings to summative assessments below)
Additional setting for marking against Schedule B
If the assessment will be set up to mark against Schedule B, please follow the steps outlined in Setting up an activity. Additionally, within the Grade settings:
- Grading method – select ‘Rubric’
Adding Weightings to Summative Assessments
After you have set up your assessment, return to Gradebook to add its weighting.
- Navigate to your course page and select Gradebook setup in the settings cogwheel menu.

Assessments stored in a Level 1 grade category
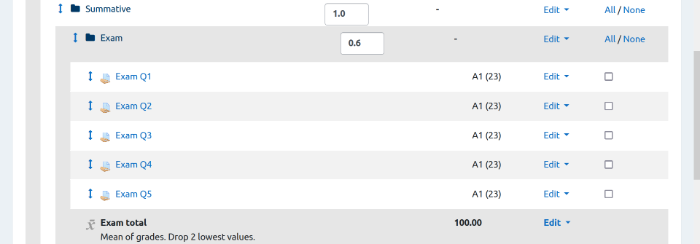
- Weights – Enter the weighting of each Summative assessment in decimals, e.g. if an assessment is worth 60% of the final grade for the course, enter the weighting as 0.6.

- Click 'Save Changes'

Once weightings have been set for each assessment, Gradebook setup provides a view of assessments, assessment types and weighting.
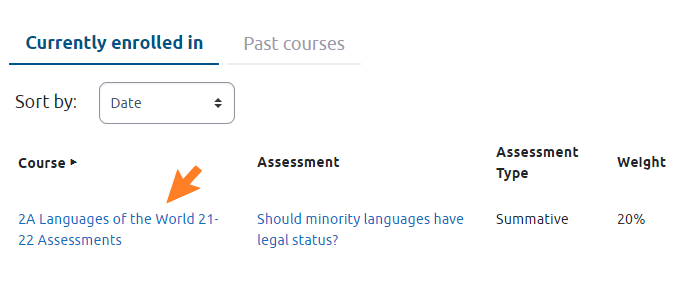
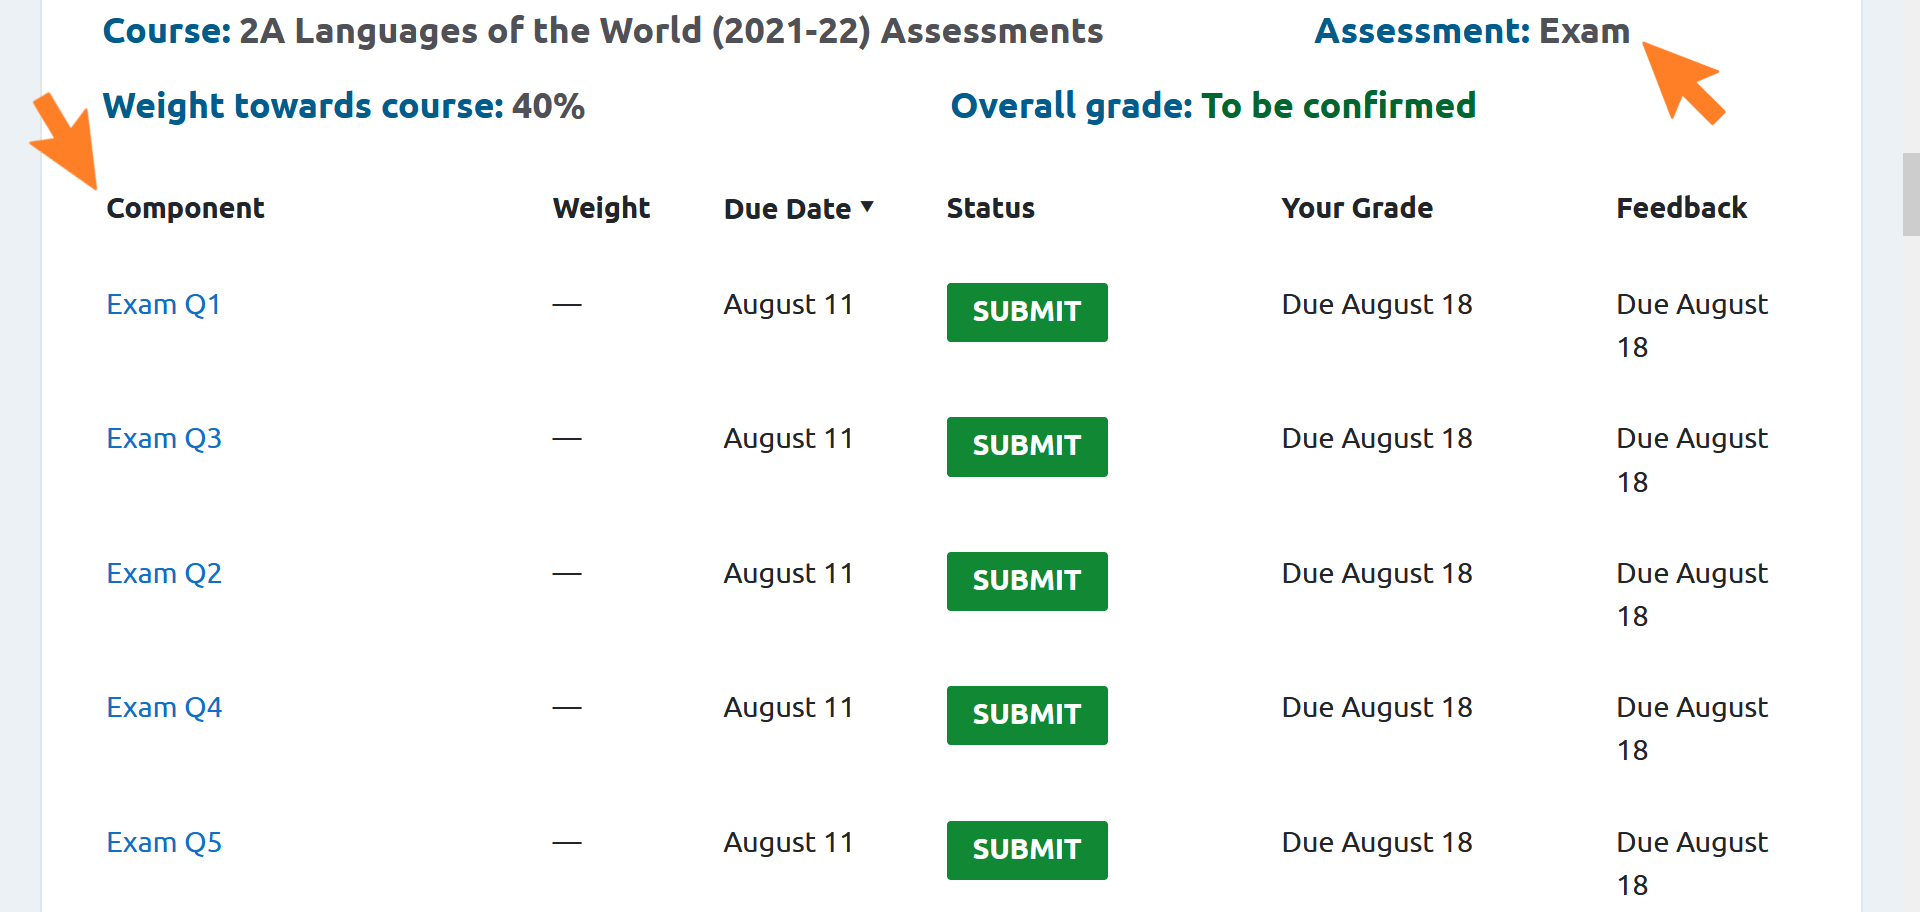
Because you have entered the assessment category and weight in Gradebook, this information will now display on the Student Dashboard (provided you have switched this on):
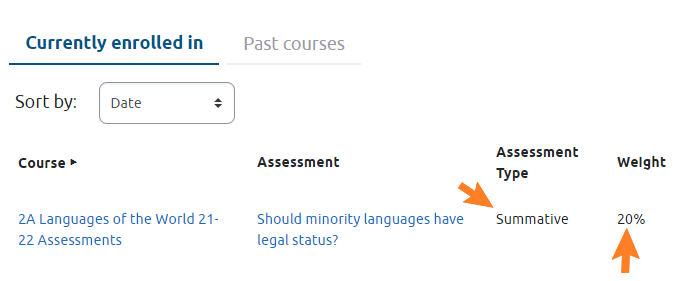
Remember: this information will not display on the Student Dashboard if you have not set up a grade category for the assessment, as described in Using Gradebook to set up grade categories for assessments.
Assessments stored in a Level 2 grade category
If you have chosen any of the following aggregation types for your Level 2 Grade Category, you must add a weighting for each of the assessments in that category:
- Weighted mean of grades
- Natural
Restricting access to an assessment
If required, you can add a grouping restriction (see Setting up groups and groupings). Note that this is not a requirement for the correct functioning of GCAT and the Student Dashboard, although it may facilitate use of these:
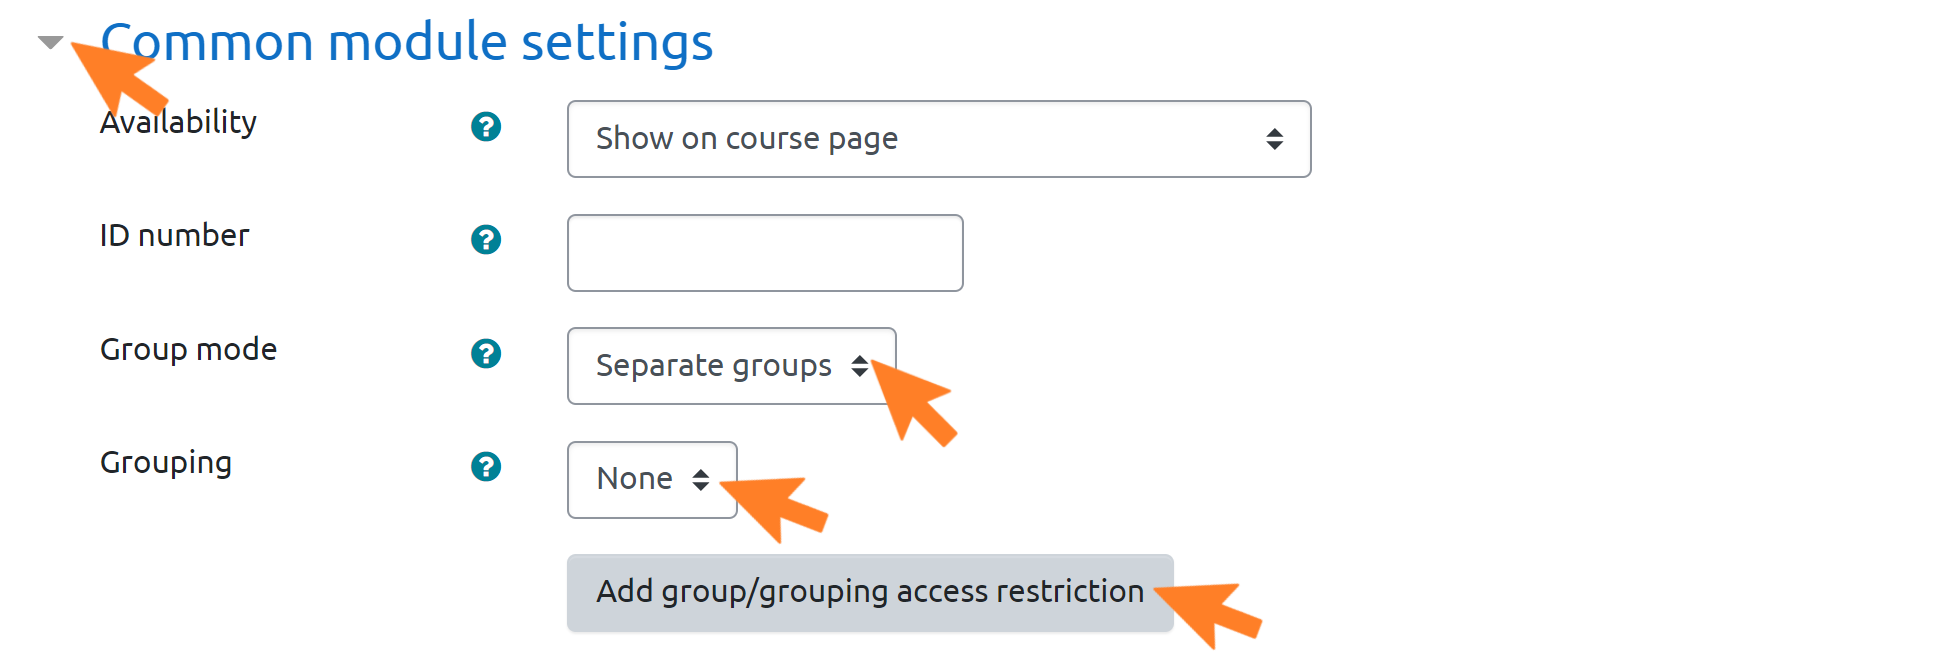
- Common module settings – expand menu
- Group mode – select ‘Separate groups’
- Grouping – select the name of the grouping which contains the group(s) to whom you wish to give access to this assessment
- Click ‘Add group/grouping access restriction’ if you wish to restrict access to a particular group
This assessment will now only be available to students in the grouping you have added. This will prevent students from accessing the wrong assessments, and will make sure that GCAT aggregates grades correctly for the relevant students.You must use groups to restrict access to assessments when these are being undertaken as resits, or in a later exam diet to other students on the course. Otherwise, the use of GCAT and the Student Dashboard does not depend on any particular settings for groups.
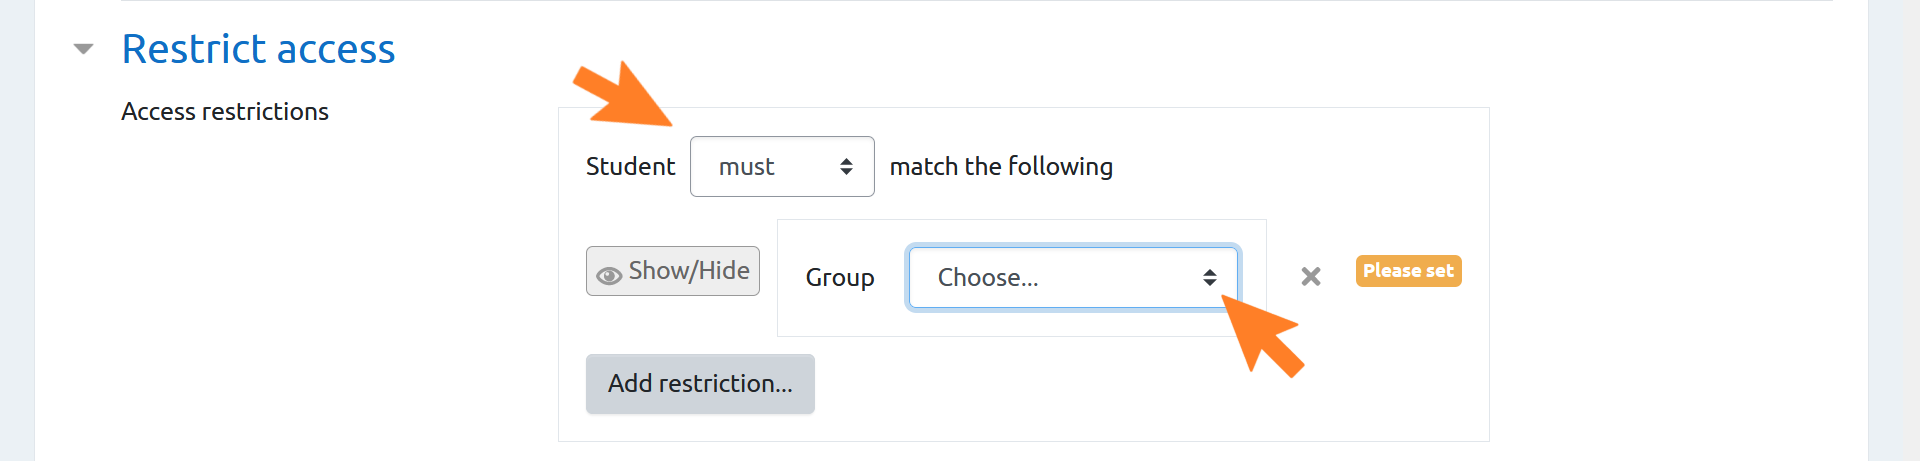
- Restrict access – expand menu
- Click ‘Add restriction’

- Click ‘Group’
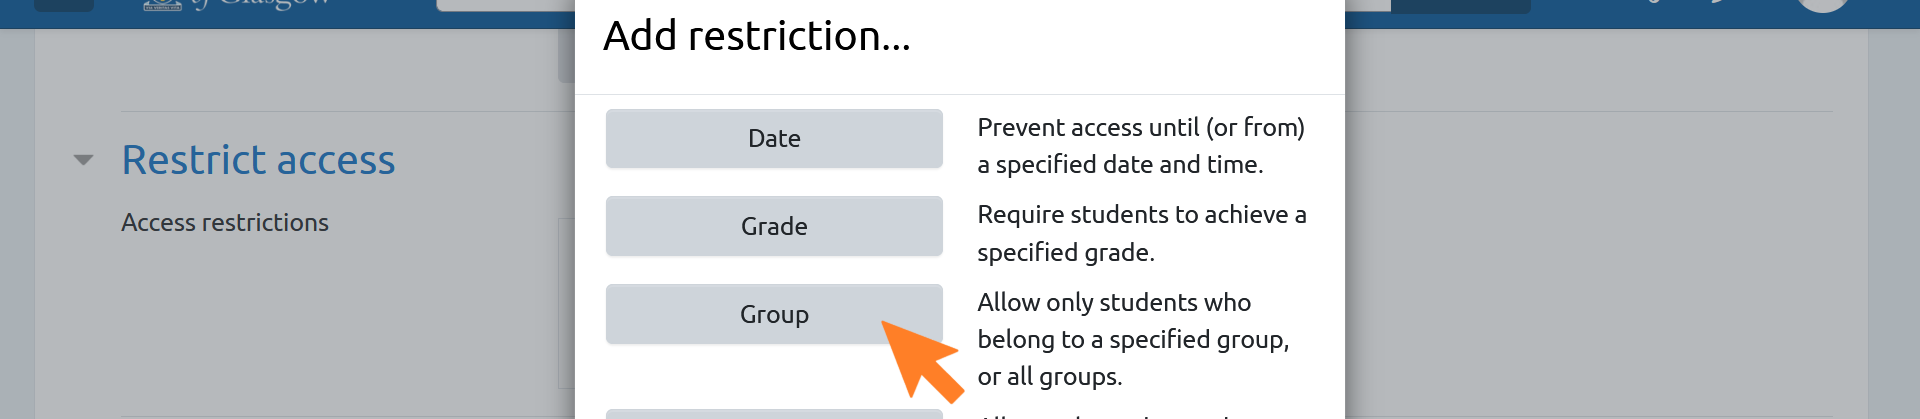
- Ensure that the first field is set to ‘must’
- Choose the relevant group name from the dropdown list
Assessment Marking and Feedback
Feedback
GCAT does not require any changes to feedback processes. Students will be able to access their feedback online in the same ways as before. Enabling the Student Dashboard will make it clearer for students how to find their feedback, but it will be stored in the same feedback area as before.
Feedback can be entered in Moodle or in Turnitin Feedback Studio as outlined in the University’s How to Moodle pages, Online Assessment How-to Guides. Feedback can also be uploaded as a file, e.g. a text document or audio file.
Marking and Recording Grades
Guidance on marking in and recording grades in Moodle and Turnitin Feedback Studio, as well as guidance on marking offline, is also available on the University’s How to Moodle pages, Online Assessment How-to Guides.
For detailed guidance on using GCAT to add and manage grades, please refer to the GCAT User Guide. For most courses, you can continue using the methods you are currently using for entering grades from first markers, i.e. directly in Moodle or Turnitin Feedback Studio, or using an offline grading worksheet.
Guidance on releasing grades to students can be found in Releasing Grades to Students in the GCAT guide.
Backing up, rolling over, and archiving courses
Taking a copy of your course prior to archiving
If there is a requirement to copy the course forward for the new academic session (without retaining student data). This can be achieved using the ‘Course Backup & Restore’. As a staff member on a given course, you will have the permissions to ‘backup’ the course.
Only the ‘skeleton’ of the course will be held in the backup file. This can then be ‘restored’ to create a new course. The new course is a copy of the original course but with no student data. Once the backup is created, it is stored in the ‘Course Backup Area’ on Moodle and can be downloaded or restored directly from this area assuming you have adequate permission to complete a restore. The backup file has a file extension of mbz and the size of this file will be dependent on the size / content of the course being backed up, so this could take a while to back up as a background process. You will be able to check the status on the ‘Restore’ page which can be accessed from the menu below by those with Staff or Manager permission only.
What if I don't have the correct Moodle permissions to restore a course?
The restore process requires adequate permissions to select the correct Moodle College / School category and a decision to restore into a new Moodle Course or a template / holding course which may have already been created for you in advance. Please speak with your College / School Moodle Administrator or Learning Technology Adviser for guidance on this process and approach that will be taken for restoring courses for next academic session (if such processes are not already in place).
Importing existing course content and assessments into a new course page
If you have existing Moodle pages with content and assessments from the previous academic year, the following outlines how to import and edit this for the new academic year. Any grade categories that have been set up can also be carried over. The guidance here describes processes for using the 'restore' feature although this is not mandatory for the correct functioning of the plug-ins; if you are already using the import feature for rolling courses over, you can continue to do this also.
Navigate to the Archive category and select the course whose settings you wish to restore into a new course page.
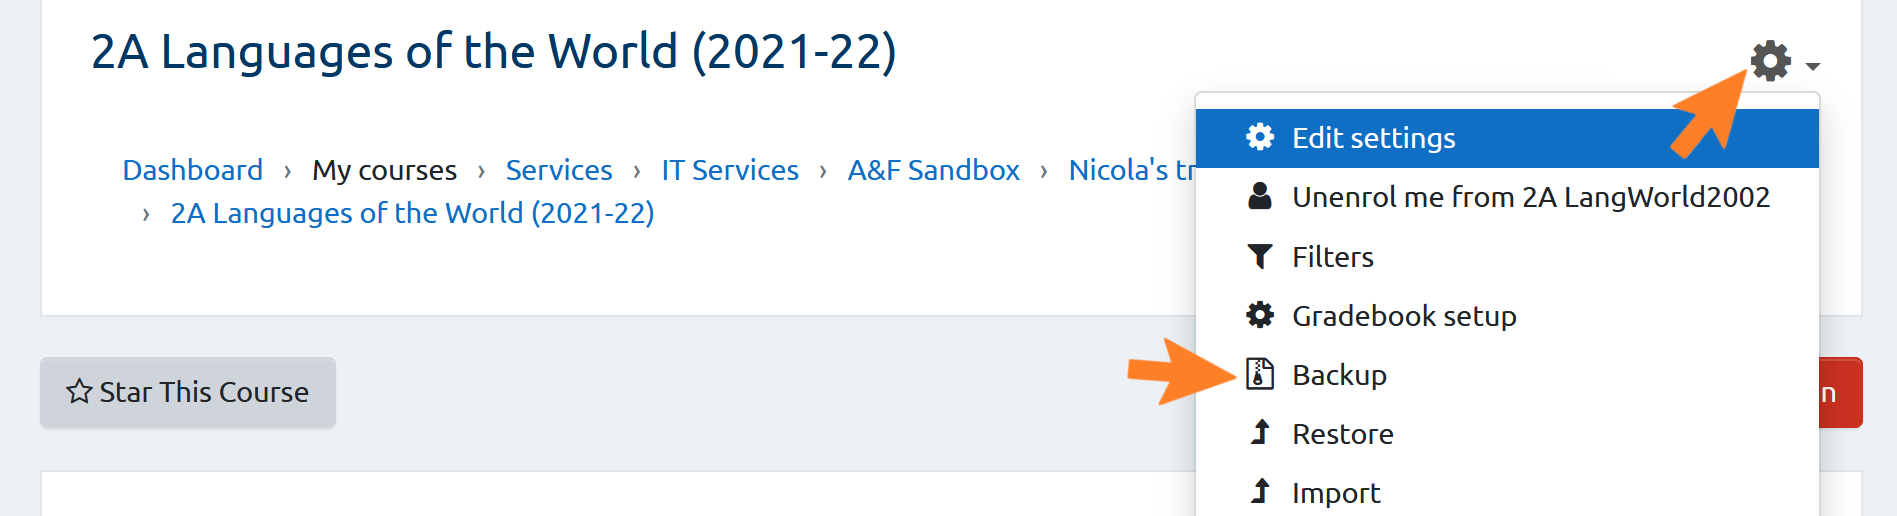
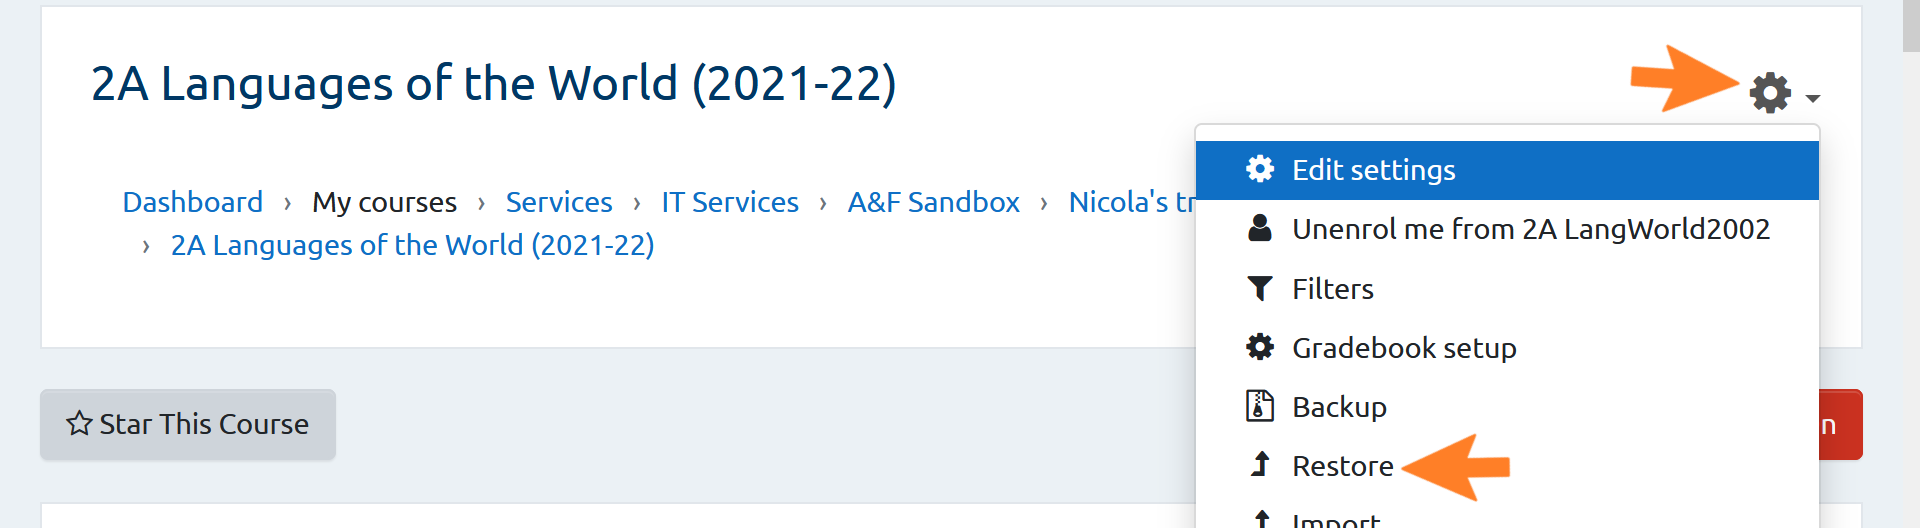
- Settings cogwheel (top right) – expand menu and click ‘Restore’
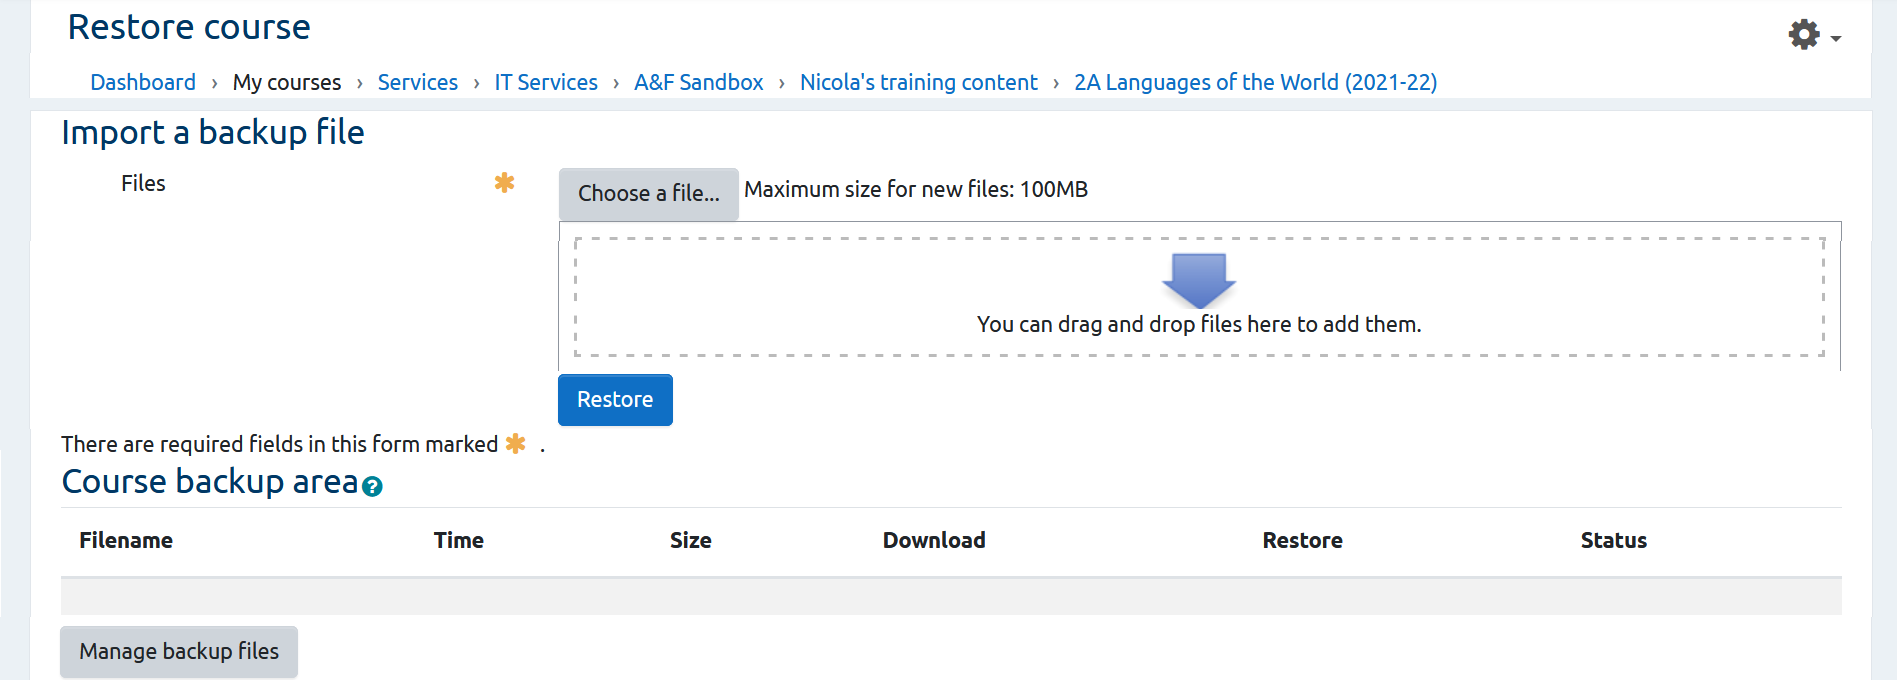
- Course backup area – choose ‘Restore’ for the relevant course, or import a backup file (see Taking a copy of your course prior to archiving, above)
- Confirm that the course information is correct
- Click ‘Continue’
- Restore as a new course
- Select category – choose the appropriate category from the options, or search categories
- Note: You may wish to choose ‘Restore into this course’, or ‘Restore into an existing course’, if you have the appropriate pages set up already. These options are not covered in these training materials.
- Click ‘Continue’
- Restore settings – adjust settings if required
- Note: While many of the settings on this page are at your discretion, we recommend that you select ‘Include groups and groupings’, as these may be of use in future (see section 6). However, this is not a requirement.
- Course settings
- Course name – enter the name of the new page
- It can be helpful, although it is not a requirement, to include the academic year (e.g. “Test Course Assessments Academic Year 2021-22”, “Test Course 2021-22”.)
- Course short name – enter the course short name
- It can be helpful, although it is not a requirement, to include the academic year in the course short name
- Course start date – ensure this is set correctly
- Note: Setting the course start date incorrectly will affect the way assessments from this course are displayed on the Student Dashboard.
- Click ‘Next’
- Deselect any items you do not wish to import
- Note: Grade categories are explained in Setting up grade categories. As described in the, Automatic generation of additional rows in Gradebook, the Grade Capture and Aggregation Tool automatically generates additional rows of data in Gradebook setup, under a category called “DO NOT USE”. This category should be ignored, and you may wish to delete it when you import content from one year’s Moodle page to the next. You should keep all the other grade categories you have set up.
- Your new page now contains all the elements of the duplicated page including structure, grade categories, groups and their restrictions, assessments and accompanying weightings.
- Edit other settings as per the guidance in Recommended and required settings for Moodle pages
- Navigate to the restored course page
- Confirm information is correct
- Click ‘Perform restore’
- Changes can be made at this point in line with the new course as needed and this page can then be managed as usual.
- Staff and students for the new academic year can then be enrolled on the new page as per the existing UofG auto-enrolment process.
- Each Moodle page must also have the correct start and end date selected when set up. This is to enable identification of ‘active’ versus ‘past’ courses on the Student Dashboard.
Archiving and displaying assessment information from previous years on the Student Dashboard
Archiving and displaying assessment information from previous years on the Student Dashboard
For the Student Dashboard to have access to previous years’ assessment information, Moodle pages must not be deleted or reset. As long as a student who was enrolled on the course has an active GUID, they will be able to access the page and its contents. The links to feedback awarded in Turnitin Feedback Studio will also remain unaffected.
If your course already has an archiving approach in place, there is no need to change this. However, it is very important to ensure that the course start and end dates are set correctly within the settings of each Moodle page, so that the Student Dashboard can identify ‘past’ versus ‘current’ courses. It is also important to ensure that the course remains on Moodle, even if you have downloaded a backup.
Setting up an 'archive' category
If your area does not already have an archiving approach in place, we recommend creating a Moodle Category for archived course pages, which includes the word ‘archive’ in the category name. You will only be able to create this category if you have Manager-level permissions for the area of Moodle in which you are working.
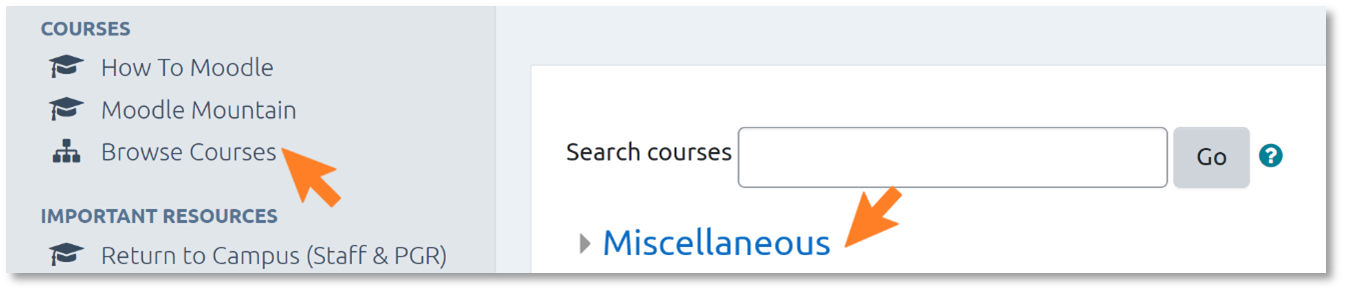
- Select ‘Browse Courses’ in the left-hand menu
- Select the category where your archive should sit, e.g. College of Arts > Humanities > Archaeology
- Click 'Manage Courses'

- Click 'Create new Category'

- Parent Category - select the Category within which the Archive should sit
- Category Name - enter a name of choice including the word Archive

- Click 'Create Category'

Moving a course to the 'archive'
Once an Archive category is available, courses can be moved as follows:
- Navigate to the course page
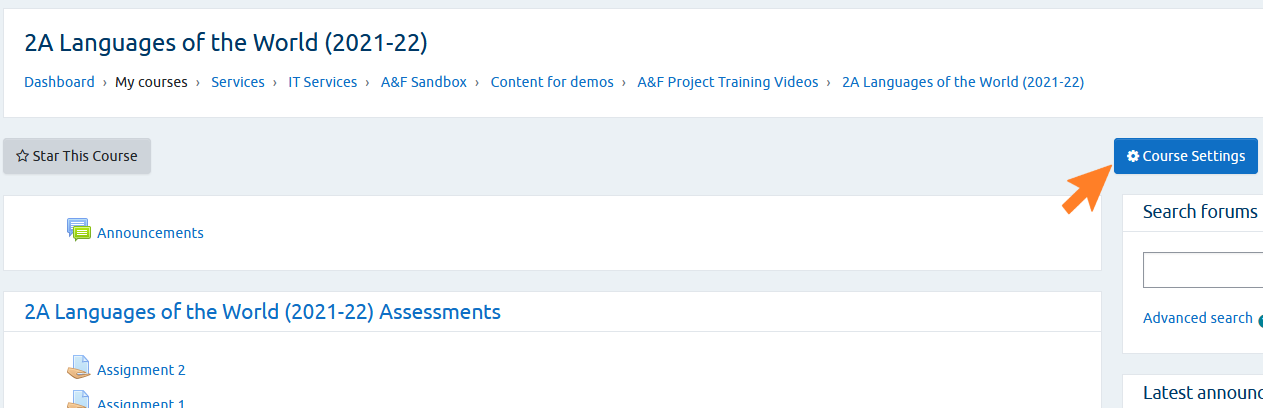
- Click ‘Turn Editing On’
- Click ‘Course Settings’

- General - expand the menu
- Course full name – ensure the name includes the academic year and the word ‘archive’
- these are not prerequisites for the correct functioning of any of the plug-ins, but they may make it easier to identify and locate courses.
- Course Category - select the category containing the word 'Archive'

- Course start and end dates - these must be entered correctly
- This will impact whether Courses appear as 'Active' or 'Past' on the Student Dashboard

- Click 'Save and Display'

A course can be moved to the ‘Archive’ category at any stage.
Display of past grades on the Student Dashboard
Grades from years prior to that in which the plug-ins were adopted by your School will not automatically be displayed on the Student Dashboard. The Moodle page relevant to those grades must be updated with the correct grade categories, weightings, start dates/end dates etc., and the Student Dashboard switched on for the course(s) on that page. In this guide, we will use “past assessments” and “past grades” to describe these assessments and grades.
Updating Moodle settings for past grades
The following settings are required for display of past assessments on the Student Dashboard. Any other settings are at your discretion.
- Go to the settings menu on your Moodle page.
- If you do not have access to this menu, it is likely that you are not set up with permissions for this. Ask an administrator in your School for guidance.
- General - expand the menu
- Course full name – it can be helpful, although it is not a requirement, to include the academic year, to make it easier to identify the page in future
- Course short name – as for ‘Course full name’, it can be helpful to include the academic year in the course short name
- Course category – Move the course page to the ‘Archive’ category, to make it clear that this course is not running currently - see Archiving Courses for guidance
Adjust the Groups setting, if necessary - see Setting up Groups and Groupings for guidance.
- Click ‘Save and return’
- Switch on the Student Dashboard, following the steps in Switching on the Student Dashboard
Updating or adding grade categories and weightings for past assessments
The assessments for your course will already be displayed in Gradebook, but they will not be in any categories, or have weightings, unless you have previously set these up (see Using Gradebook to set up grade categories for assessments).
When you have set up your grade categories, you can move each assessment to the appropriate category in Gradebook, or by changing the category in the assessment settings (see Setting up an activity).
To move assessments to different categories within Gradebook:
- Select the assessment(s) you are moving

- Scroll to the end of the page
- Move selected items to – choose the category to which you want to move the assessment

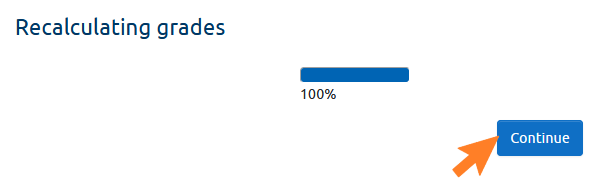
- If you see the screen “Recalculating grades”, click ‘Continue’
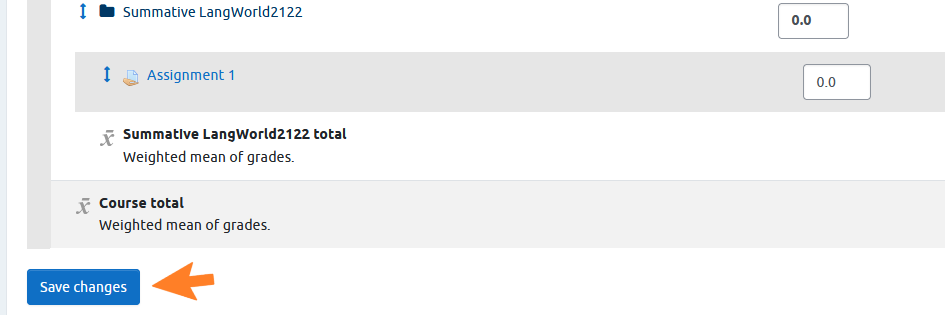
- Click ‘Save changes’
- From Gradebook setup, add weightings to your summative assessments, following the procedures in Adding weightings to summative assessments.
Releasing past grades to the Student Dashboard
To release past grades to the Student Dashboard, you must do so using the Grade Capture and Aggregation Tool (GCAT). For current courses, we recommend that a comprehensive record of each grade and any additional versions of that grade are stored in GCAT. However, as you will already have this record elsewhere for past courses, you may prefer to just work with the final, ratified, version of each grade (i.e. the version that displays in MyCampus).
If the grades you wish to display on the Student Dashboard are not already in Moodle, you should add these – for guidance on marking in and entering grades to Moodle, see the University's How to Moodle pages.
Once the grades are in Moodle, follow the steps in Importing an Activity’s Grade into the Grade Capture Tool.
Then, following the steps in Release final course grades, release the grades to the Student Dashboard. You do not need to release provisional grades if you are already working with the final grade for each assessment. If for any reason a past grade has not been ratified, then you should release this as provisional until ratification, following the steps in Provisional Grade Generation.