

Grade Capture and Aggregation Tool
This page provides an accessible version of training documentation for the Assessment and Feedback project.
This webpage will focus on the Grade Capture and Aggregation Tool.

The Grade Capture and Aggregation Tool is only visible to staff and people external to the University who are involved in grading, e.g. NHS staff for clinical activities, or external examiners. Students do not have access to this plug-in.
Grade Capture Tool
The Grade Capture Tool is the first tab on the new Moodle plug-in. It captures grades for individual graded assessment activities. This is only visible to staff and people external to the University who are involved in grading, e.g. NHS staff for clinical activities, or external examiners. Students do not have access to the Grade Capture Tool.
Individual Schools are deciding if and when to enable the Grade Capture Tool for their courses. If you have any queries about when the tool will be enabled for your course, please contact an administrator for your School.
The tool pulls in the first grade for an activity from Moodle (depending on the activity type), and can be used to input additional grades, including second grades, moderated grades, late penalties, and others. The historical record of all grade variations can be viewed within the tool. Once the final provisional grade has been agreed, this grade can be pushed back into Gradebook where students will be able to view their provisional grade for the activity.
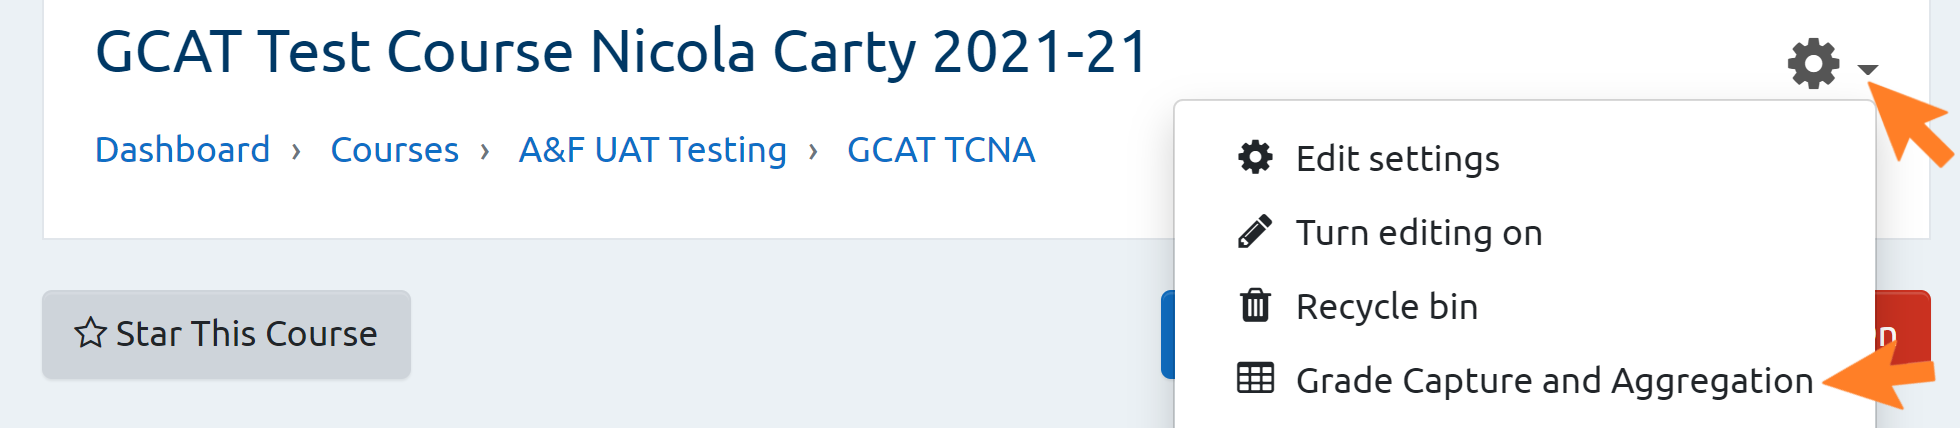
Opening the Grade Capture Tool
Grades for students are captured and adjusted in the Grade Capture & Course Grade Aggregation Tool.
This can be opened as follows:
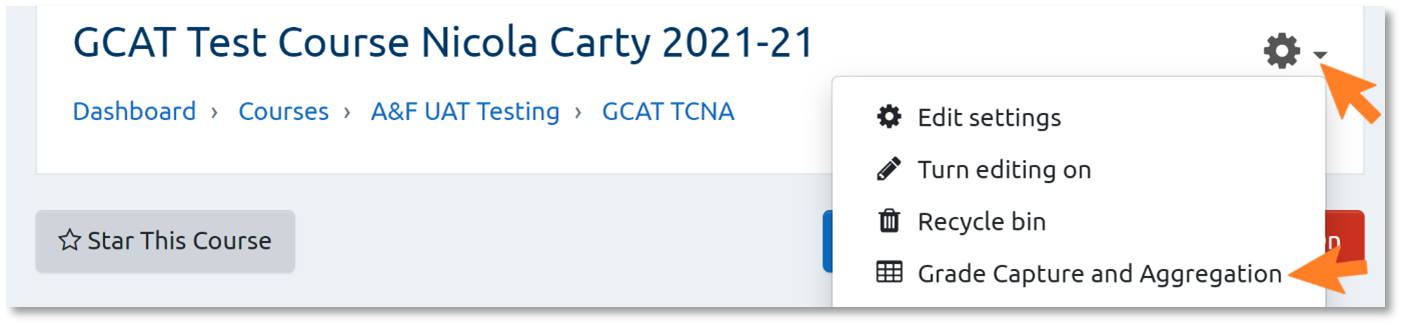
- Click the Settings cogwheel on the Moodle course page for the course which holds the assessment wished to capture grades for
- Select ‘Grade Capture and Aggregation’
The Grade Capture and Aggregation Tool will open on the Course Grade Capture tab, where you will see a blank table with headers for student information and Grades.
- Click the magnifying glass beside ‘Student No.’, ‘Surname’, or ‘Forename’ to search for an individual student.
- Note: Only staff with Manager permissions on Moodle will be able to see students’ surnames and forenames. They will be also be able to hide this information, as described below. All other staff will only see student ID numbers.
- Click any column header to sort the information in the Assessment Grade Capture tool by that column.
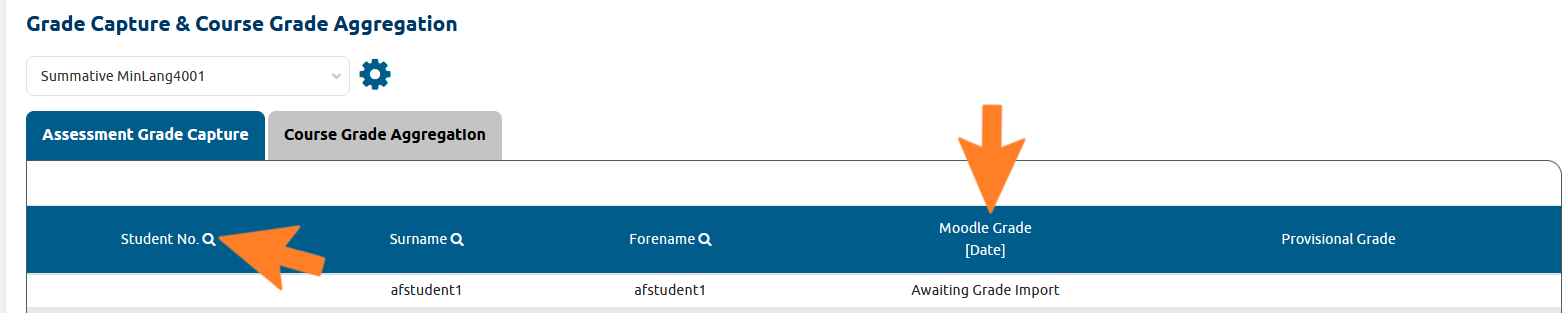
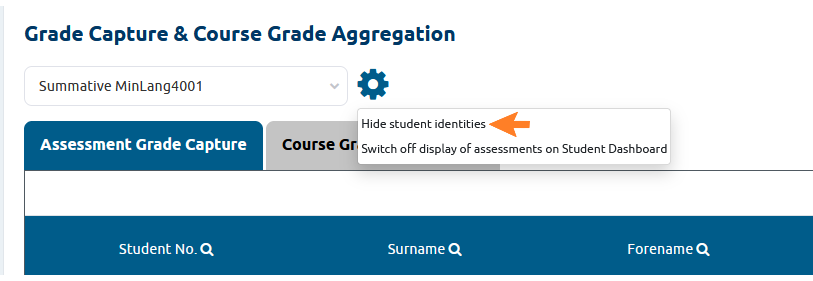
- Staff with Manager permissions can access the setting to show or hide student identities, using the settings cog.
- Note that other members of staff will never be able to see student identities. Student identities can be made visible for external examiners.
- When the Grade Capture Tool is opened, select the Course Grade Category for the course wished to view e.g. Summative.

- Select the ‘Gradable Activity’ or a Level 2 Grade Category, wished to capture grades for e.g. Essay 1 Summative

- If a Level 2 Grade Category is selected in the second drop-down (as opposed to a single gradable activity), select the gradable activity from the third drop-down menu that will appear
- Note: See Moode Enhancement Guide for further information on Level 1 and Level 2 Grade Categories

The Grade Capture and Aggregation Tool will open on the Course Grade Capture tab, where you will see a blank table with headers for student information and Grades.
- Click the magnifying glass beside ‘Student No.’, ‘Surname’, or ‘Forename’ to search for an individual student.
- Note: Only staff with Manager permissions on Moodle will be able to see students’ surnames and forenames. They will be also be able to hide this information, as described below. All other staff will only see student ID numbers.
- Click any column header to sort the information in the Assessment Grade Capture tool by that column.
- The ‘sort’ function will only sort the data that is currently displayed on the screen. Therefore, if a cohort of 150 students if to be sorted, the sort activity will only apply for the first 50 students displayed and has to be repeated for all following screens. This is a limitation to the current build. If it is required to sort through the entire cohort of 150 students at once, we recommend downloading a csv of the data and sort through the data there.

- Staff with Manager permissions can access the setting to show or hide student identities, using the settings cog.
- Note that other members of staff will never be able to see student identities. Student identities can be made visible for external examiners.

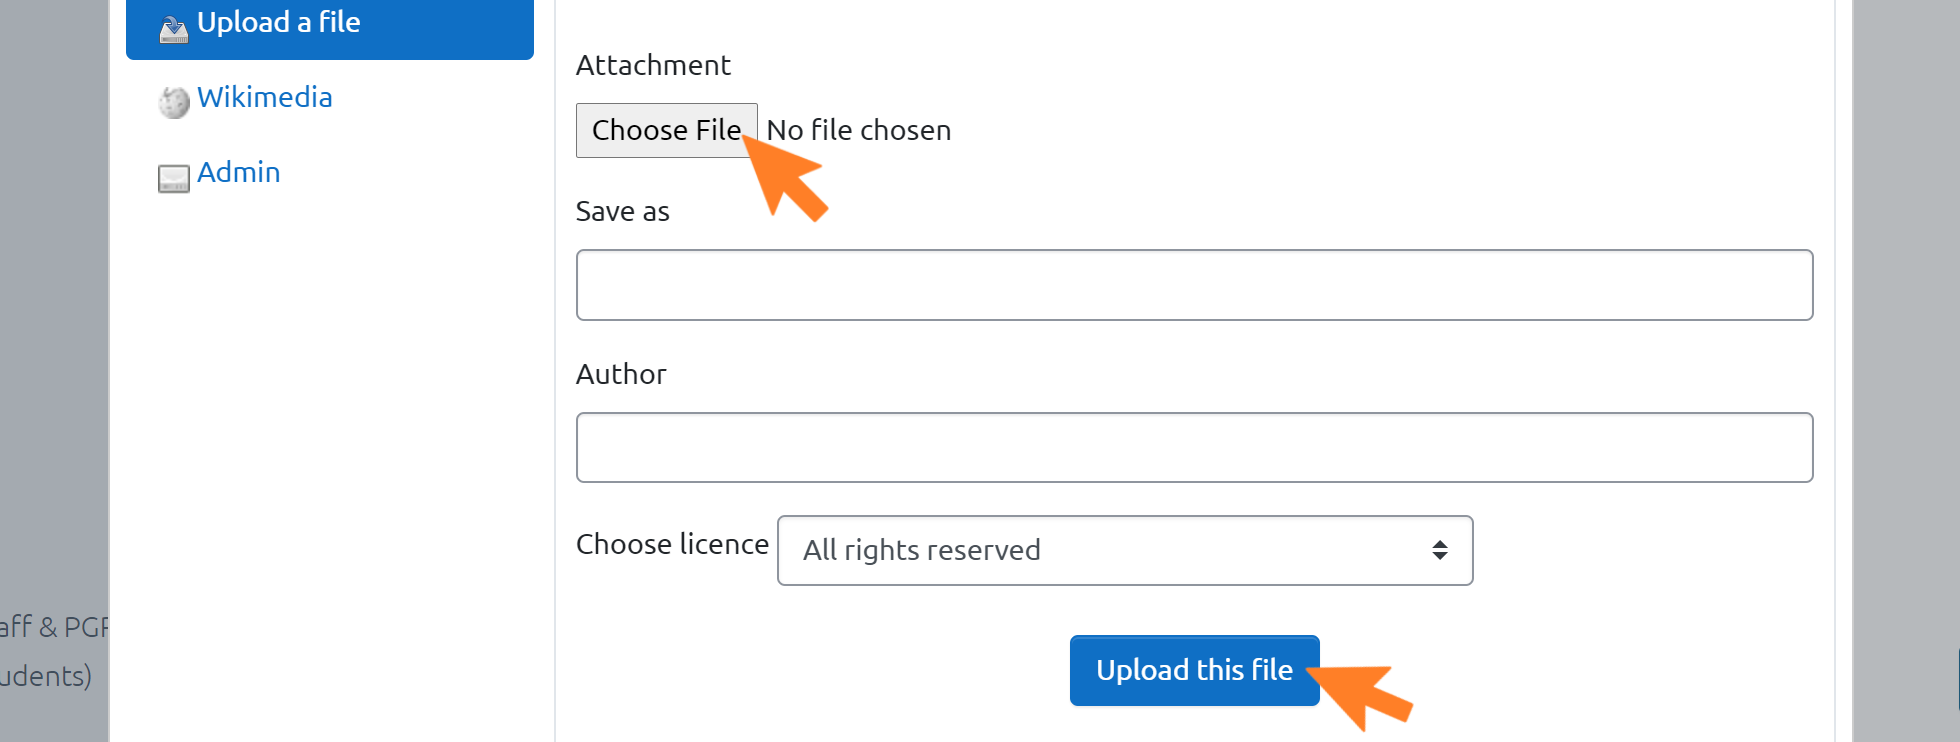
Importing a grade into the Grade Capture Tool
Once students have completed their assessment and the first grade has been entered to Moodle (see the Moodle Enhancement guide for eligible grading processes), the grades can then be imported from Moodle into the Grade Capture Tool.
Open the Grade Capture Tool as outlined in section above
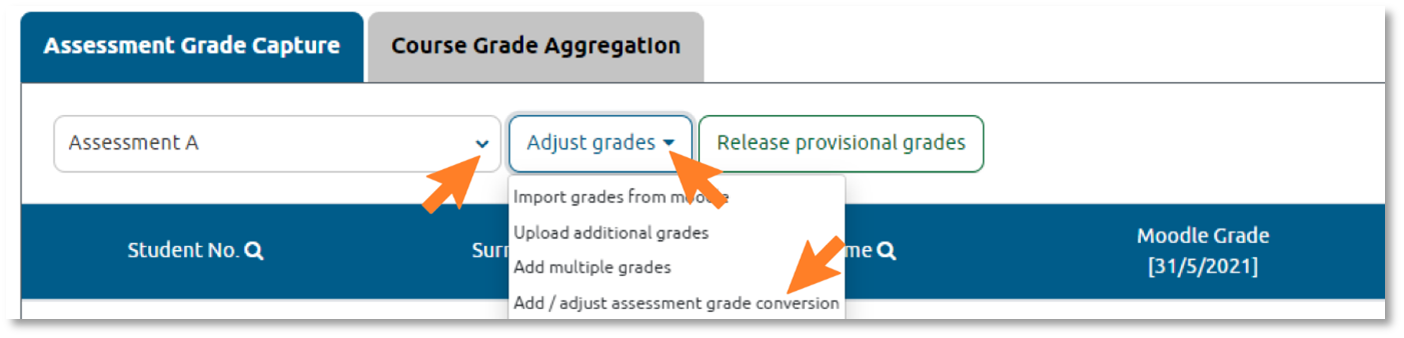
- Click ‘Import Grades from Moodle’ on the Grade Capture Tool. This will import all the grades that have been added in Moodle when marking the assignment

- Any additional grades (e.g. 2nd marking, moderation, etc.) can now be added and recorded in the Grade Capture Tool as outlined in the 'Adjusting and adding additional Grades' section.
- We recommend that users do not import grades from Moodle more than once:
- Any further import beyond the initial one will overwrite the ‘Imported Grade’ column on the Grade Capture Tool and update the provisional grade to reflect the latest imported grade
- This means that any late penalty, good cause claim, or other grade version will no longer be reflected in the provisional grade and must be re-added
- A warning message will appear to warn the user that they are about to overwrite the original imported grades.
- Once the activity’s grade has been imported, if the Assignment has been set up to use ‘Marking Workflow’, the workflow status in Moodle will be set to ‘In Review’. This will indicate that all further marking actions should take place in the Grade Capture Tool.

NB: Local practice on recording grades varies. In some areas, a first and second marker will agree on a student’s grade before it is recorded in Moodle. In others, a first marker will record a grade, and then a second marker or moderator records their grade. Both practices are in line with the University’s Code of Assessment.
Where a grade is agreed upon before recording it in Moodle, there is no process change required at this point. If it is then necessary to add other grades, e.g. following resits, please follow the guidance in the next section of this guide.
Where the grade to be awarded by the second marker differs from that awarded by the first marker then existing practices to arrive at an agreed grade within each school are to be followed.
Importing grades for Level 2 Grade Categories
After the initial grades for the assessments or components of assessment stored under the Level 2 Grade Category have been captured in core Moodle, a member of staff can navigate to GCAT as outlined above.
- On the Assessment Grade Capture Tab, selects the Level 1 Grade Category in the drop-down menu at the top of the screen
- Select the Level 2 Grade Category from the second drop-down menu

Click “Import all sub-category grades”
- This button is dynamic and is only presented when the user has selected a Grade Category on the second dropdown menu
- Clicking this button will import all the grades from Moodle for all the components in the sub-category
- Note that all component grades must be in a grade type which is accepted by GCAT. If any of the components in the bulk import use a grade type which is not accepted by GCAT, then an error will be displayed and component grades will not be imported

Adjusting and adding additional grades
Additional assessment grade versions can be input either against all students (who have sat the assessment) or against a single student. The additional grades in Schedule A or B can be selected from a drop-down menu, and grades in Points can be manually entered. In the case where an assessment graded in Points has been converted to Schedule A or B, any grade adjustments are to be continued to be input in Points. This will be especially relevant for second and third markers, or when entering late penalties.
Any changes to the grade, irrespective of a school’s chosen practice, and all additional grades should be captured as a new version of the original grade, in GCAT, as a means of maintaining a full audit of grades related to each assessment. Thus, once a grade has been entered, that precise grade cannot be removed, but only be adjusted via entering a new grade as outlined in the sub-section below, 'Adjust a grade for an individual student'.
Note: Updating a grade in Moodle does not automatically update that grade in GCAT. We recommend adding any new versions of grades directly in GCAT, to maintain an audit trail. If you update a grade in Moodle and then choose to import grades into GCAT again, the ‘Imported Grade’ column will be over-written, and the provisional grade will be updated to reflect the latest imported grade. Any late penalty, good cause claim or other grade version will no longer be reflected in the provisional grade and must be re-added
If a user tries to import grades more than once, a warning message will appear to warn them that they are about to overwrite the original imported grade and that the provisional grade will not reflect any additional grades which have been input into the tool. The user must click ‘continue’ to proceed with the action.
Adjust grades for all students
To adjust grades for all participants, such as in the case of a second marker:
- Click ‘Adjust grades’
- Select ‘Add multiple grades’ from the dropdown menu

- Select ‘Reason for Grade’ for the new grade

- Select a grade for each student’s assessment
- For assessments marked in Points, grades in whole numbers can be entered for each student in a text field. The grade must be a grade available within the maximum points for the assessment.
- If the grade entered is not accepted, the textbox will be highlighted in red

- Click ‘Save multiple grades’ to save

- The provisional grade in the ‘Provisional Grade’ column will now reflect this latest grade (refer to the 'Provisional Grade Generation' section for more detail on provisional grades)
Upload additional grades for multiple students
A csv can be uploaded to GCAT to add additional grades for multiple students. These grades must be in the same scale as the original grades, i.e. Schedule A, Schedule B, or Points. If the grade type is Points, the maximum grade available is displayed.
- Navigate to the bulk upload feature by selecting ‘Adjust grades’
- Click ‘Upload additional grades’
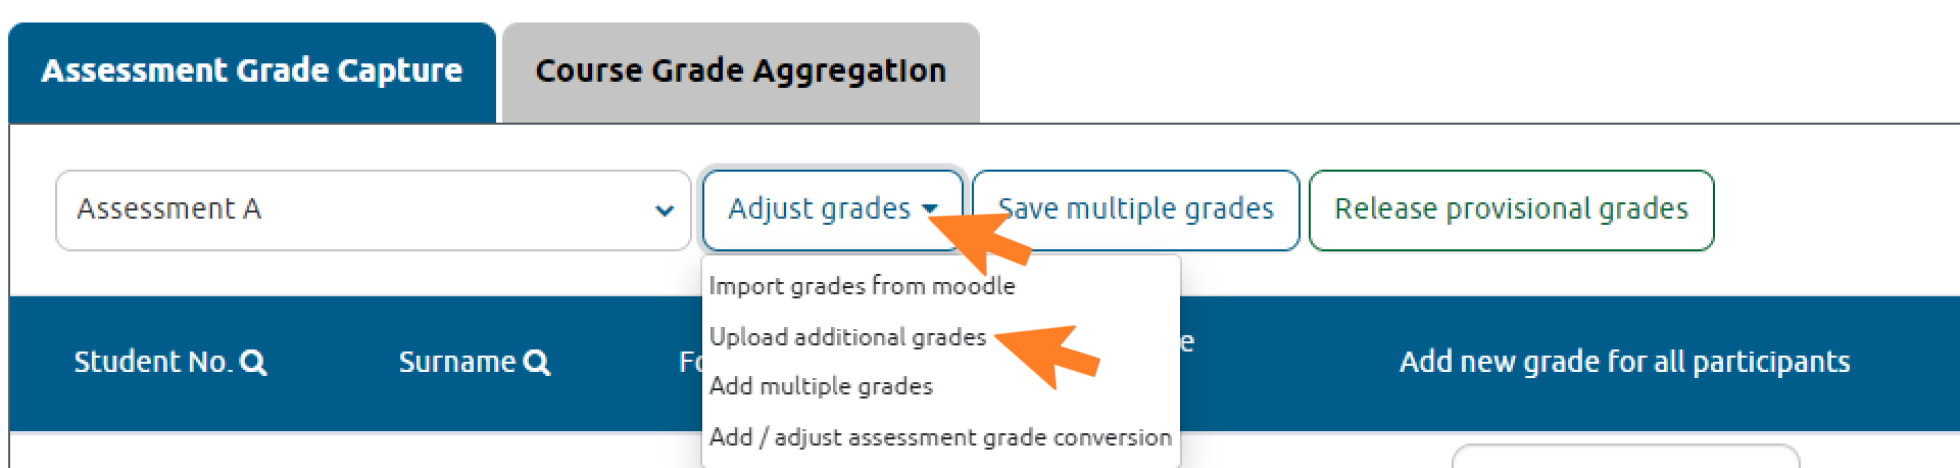
- Click ‘Download .csv’ for a template or prepare your own .csv file
- For assignments, the csv template must contain 3 columns in the following order: the student number (populated), the participant number (populated) and the grade (blank):
- For workshops, quizzes and forums, the csv must contain 4 columns in the following order: the student number (populated), student first name (populated), student last name (populated) and the grade (blank):

- Input the grades into the grade column and save the csv.
- Click ‘choose a file’ in the bulk upload feature

- Select your csv file and upload it
- Select whether to ignore the first row.
- The first row can be ignored in cases where the first row contains headers in the csv file.

- Click ‘Upload grades’
- The bulk upload feature matches the data in the csv against the student number and presents a view preview of the data

- Select the reason for the additional grade
- Click ‘Import file’

The grades will be saved under a header which will be the selected reason. The provisional grade will be updated to reflect these latest grades.
Adjust a grade for an individual participant
If only one individual's grade needs to be adjusted/added:
- Click ‘Add new grade’ next to a single student’s name
- Staff will be required to select a grade for the student’s assessment according to the Schedule the assessment is graded under.

- Reason for Grade – select the reason for the new grade
- If selected ‘Reason for Grade’ is ‘Other’, enter the reason for the grade into the notes field
- Grade - select a grade
- Notes – specify the reason for the amendment
- Click ‘Confirm new grade’ to save the new grade for the student
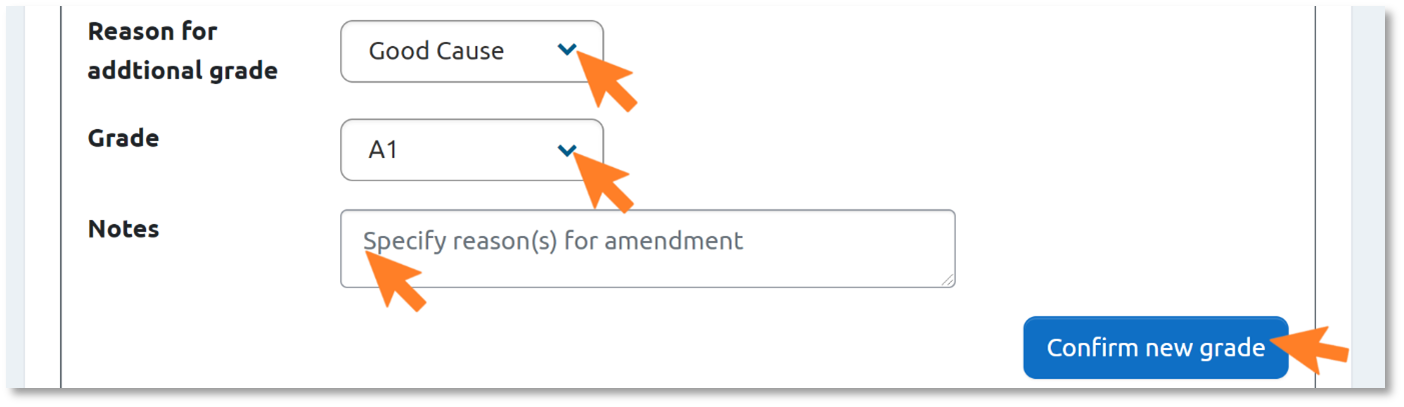
- The new grade will now be displayed in a new column in the Assessment Grade Capture tab.
- The provisional grade in the ‘Provisional Grade’ column will now reflect this latest grade for that student.
Where a student has been given an administrative grade for an assessment or the course overall and the marker wishes to revert back to the original 22-point scale grade:
- Open the Course Grade Aggregation tab, as outlined in Opening the Grade Aggregation Tool
- Adjust course weightings, as outlined in Adjusting Assessment Weightings for an Individual Student
- Make no other changes
- Click ‘save’
- The grade should revert from “MV” (or other administrative grade) back to what it was previously
- To ensure that the correct grade is displayed once reverted, you can review the grade history by clicking on the ellipsis next to a student's aggregated course grade and selecting ‘View Course Grade History’ from the dropdown menu

Discrepancies between first grade, second grade, and third grade
If the first and second grades, the second and third grades, or the first and third grades do not match, these will be highlighted to notify the marker of the need to review the discrepancies.
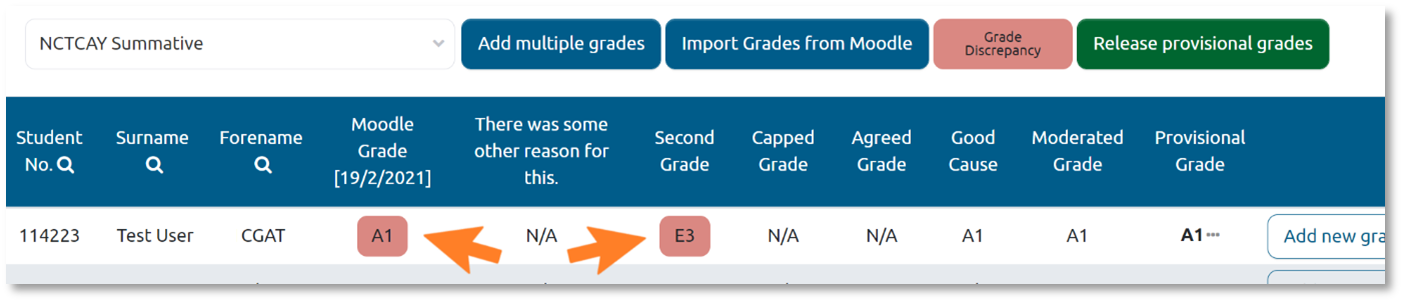
Once an ‘Agreed Grade’ has been added via the steps outlined in Adjust a Grade for an Individual Student, the highlighting will disappear.
Adding a late submission grade after initial import has been carried out
If a student submits an assessment late (once other students’ grades have already been imported and adjusted in the Grade Capture Tool), this could have negative impacts on the overall use of the Grade Capture Tool.
As previously mentioned, given that the Provisional Grade column is equal to the latest grade updated in the Grade Capture Tool, if a member of staff re-imports grades from Moodle, then the provisional grade will be updated to be equal to that Moodle grade. Any additional grade versions (e.g. late penalties, good cause claim grades etc.) will no longer apply to the Provisional Grade and will need to be added again. Therefore, it is recommended that grades are only imported once from Moodle to avoid duplication of work.
In order to record a student’s assessment grade when they have submitted late (too late to incorporate into the Grade Capture Tool processes), it is recommended that their grade is recorded directly in Moodle / Gradebook and not imported in the Grade Capture Tool.
The grade will still be available for the Grade Aggregation Tool to use as part of the course grade aggregation calculation, however the assessment grade history for this grade will not be available.
Grade Conversion
Grades for assessments originally graded in Points can be converted into the 22-pt scale (either Schedule A or Schedule B) using the Grade Conversion functionality. The tool cannot be used to convert from Schedule A/B into Points. This tool can be used either for a single assessment, or for an assessment made up of multiple components. For information on how to convert assessments made up of multiple components, please see the section on [LINK]
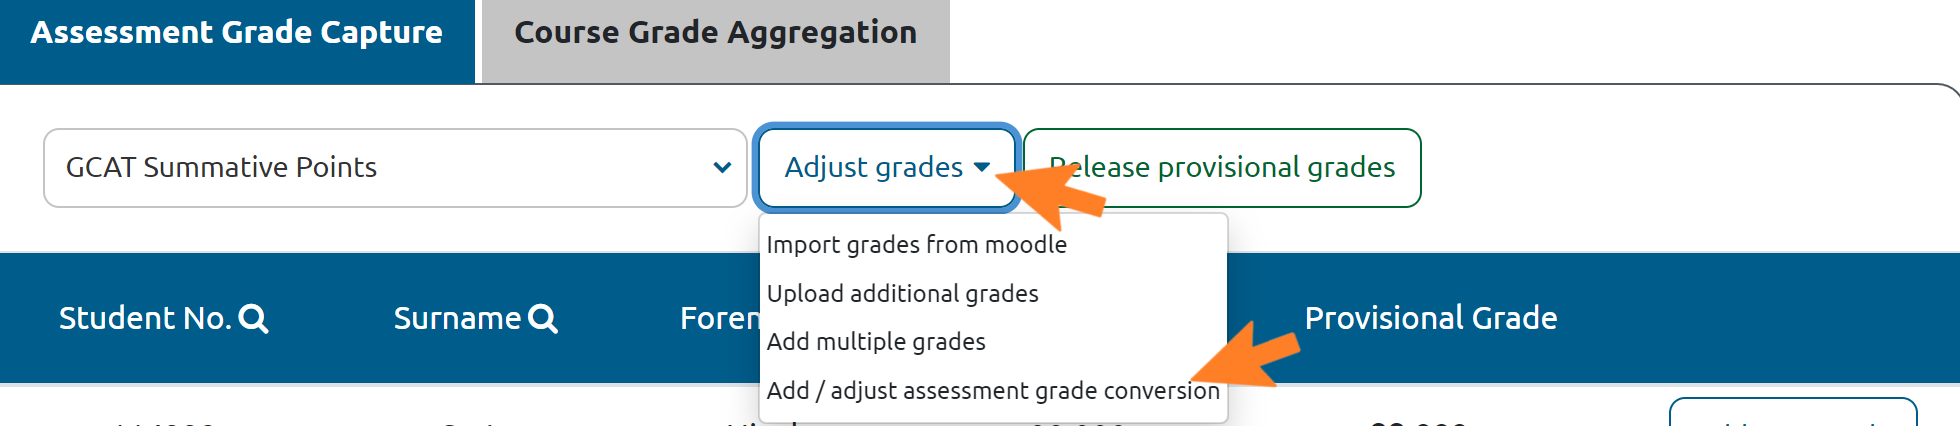
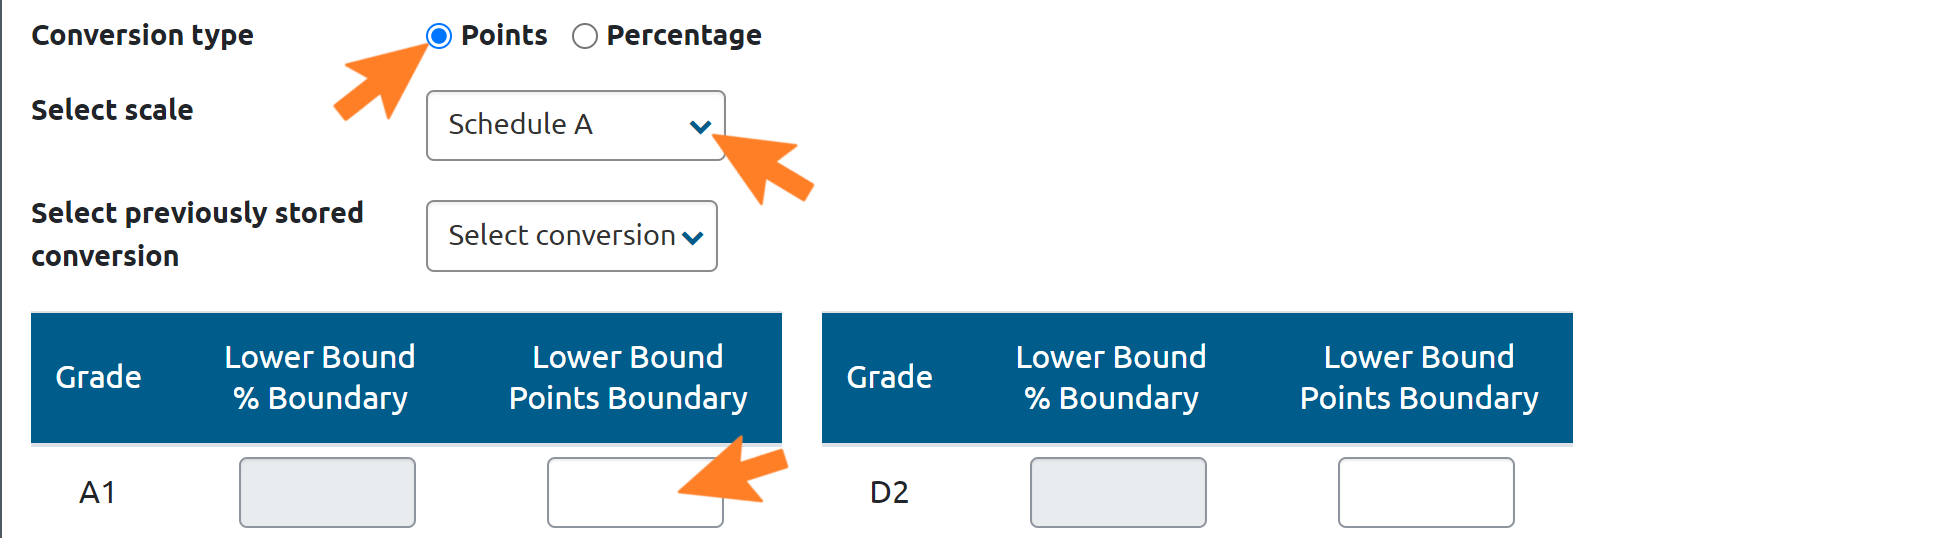
Setting up a Grade Conversion
- On the Assessment Grade Capture tab, select the assessment wished to convert
- Click ‘Adjust grades’
- Select ‘Add/adjust grade conversion’
- Conversion Type – Select ‘Points’ or ‘Percentage’
- This will decide which grade boundaries are to be entered into the columns
- Note that if the grade boundaries are changed after values have already been added, the columns are returned to being blank.
- Select scale – select from the dropdown menu
- Depending on the scale selected, the grades available for the conversion change accordingly.
- Input data into the selected column.
- As the user inputs into a column, the system automatically calculates the relevant % or Points grade boundary and displays this on the greyed out, inactive column
As values are being entered ensure that the following validation rules are met:
- Values can be input with up to 2 decimal places (e.g. 80.58)
- Values must be unique and in order (e.g. A1 = 90; A2 = 85; A3 = 82 etc.).
- The fields for A1 and for H must be set. H must be set to 0. Other fields may be left blank if required.
- Optional - save the conversion scale by adding a name for the scale
- This will store the conversion scale as a template for future use
- To permanently overwrite a template, edit and save the conversion scale as a new template. The original template will not be deleted.
- Note: Conversions are saved per user and cannot be shared across a team or course.
- Click ‘Save changes’.
- If the validation rules are not met, then the tool displays an error or highlight the text-box in bold red and the user will not be able to save the changes.

- The original grade and the converted grade are now visible on the Assessment Grade Capture screen.
Note: Grades will not be rounded. If the grade conversion is set as whole numbers, the grade achieved by a student can be 0.5 below the grade boundary. Grades which are 0.51 below the grade boundary will not be rounded up. For example, if the boundary for an A2 is 80, a student who obtains 79.500 will achieve an A2, but a student who obtains 79.499 will receive an A3.
Adjusting converted grades
Once a grade conversion has been set up, it can be edited as follows:
- Navigate to ‘Adjust grades’ and selecting the menu item ‘Add/adjust grade conversion’
- Enter the desired edits to the grade conversion
- As a grade conversion already exists, when the grade conversion screen loads, the data for the existing grade conversion will be presented.

- Click ‘save changes’

- The updated grades are now visible on the Assessment Grade Capture screen.
To view a history of the individual grade changes:
- Click the three dots next to a student's provisional grade
- Select ‘Assessment grade history’
This will display an audit trail of the conversion originally applied, and any grade changes because of the grade conversion scale being modified.

Provisional Grade Generation
The provisional grade is equal to the latest available grade based on the date it was added. As soon as a grade for an assessment has been imported into the Grade Capture Tool, the provisional grade is viewable by staff within the Grade Capture Tool at any point in the grading process.
Note: If grades are imported from Moodle a second time, those will overwrite the ‘Imported Grade’ column on the Grade Capture Tool and update the provisional grade to reflect the latest imported grade. This means that any late penalty, good cause claim, or other grade version that had previously been added will no longer be reflected in the provisional grade and must be re-added.
Releasing Results to Students
To release the grades to the students:
- Click ‘Release provisional grades’

- Click ‘Yes, release provisional grades’

- The marking workflow status is then automatically updated to ‘Released’
- Students are now able to view the grade on their Dashboard, within Gradebook and on the assessment page.
- For administrative grades (e.g. NS/MV), the grade is recorded as ‘Null’ under the grade and the code is reflected in the grade comments / feedback
- Students will be able to view this code in their grade comments / feedback
Please note that GCAT contains an audit trail of all grades awarded for an assessment, however only the confirmed provisional or ratified grade is ever released to students.
Hide a grade from an individual student
A grade can be hidden from an individual student if, for example, that student is under investigation for plagiarism and their result is not ready for release.
- Select the drop-down menu next to the Provisional Grade and select 'Hide Grade'
- It is important to ensure that this is done before the grades are released to the rest of the students
- When ‘Release provisional grades’ is selected all grades are sent to Moodle except the hidden grade(s)
- The student’s grade can continue to be updated in the Grade Capture Tool

- The Assessment Grade overview now indicates that the grade is hidden within the ‘Provisional Grade’ column.

- Once the student’s grade is ready to be released, select the drop-down menu next to Provisional Grade and select ‘Show Grade’.

- Click ‘Release provisional grades’ to make the grade available to the student in Moodle as per the process above.

Course Grade Aggregation Tool
The Course Grade Aggregation Tool is to be used when all assignments have been completed. It is used to generate the overall course grade for each student on the course.
The tool enables editing of final grades at Exam Boards. The final, ratified course grade will be made available to download in a .csv file ready for uploading to MyCampus
The Course Grade Aggregation Tool is only visible to staff and people external to the University who are involved in grading, e.g. NHS staff for clinical activities, or external examiners. Students do not have access to this.
Individual Schools are deciding if and when to enable the Course Grade Aggregation Tool for their courses. If you have any queries about when the tool will be enabled for your course, please contact an administrator for your School.
Setting up the Grade Aggregation Tool
The grade categories must be set up correctly (see Using Gradebook to set up grade categories), and include the assessments that make up the course.
For courses where there is a choice of assessments for students, multiple grade categories must be set up for each possible combination of assessments a student may take. This is to ensure that the grade aggregation calculation calculates correctly.
Opening the Course Grade Aggregation Tool
- Click the Settings cog icon on the Moodle course page
- Select ‘Grade Capture and Aggregation'
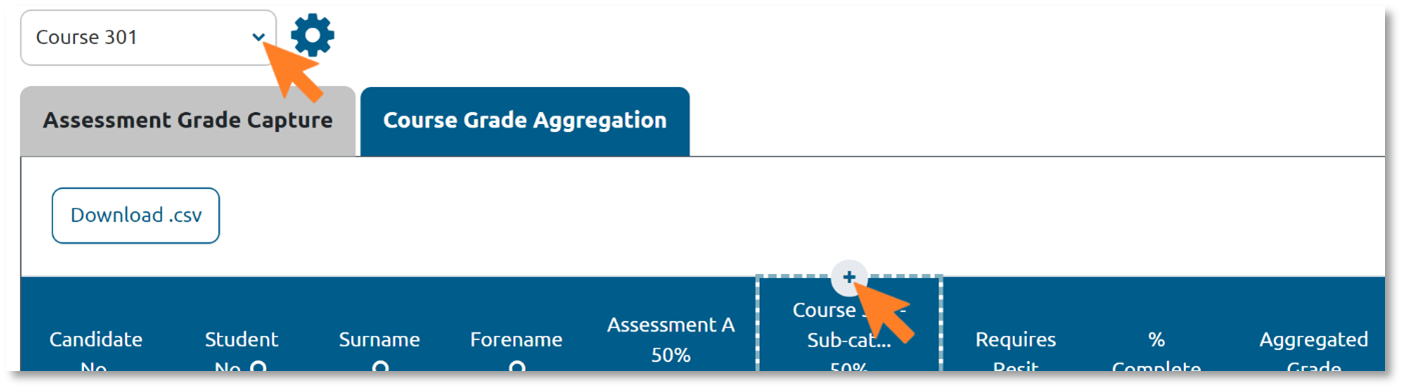
- Click on the Course Grade Aggregation tab
- It presents the provisional grades for each assessment for each student, which are pulled from the Provisional Grade available in the Grade Capture tab

- Select the grade category to show all students enrolled on the course page in Moodle
- At this point, only the single aggregated assessment grade is displayed. To view the sub-category assessments information, expand the collapsed Level 2 Grade Category assessment columns.
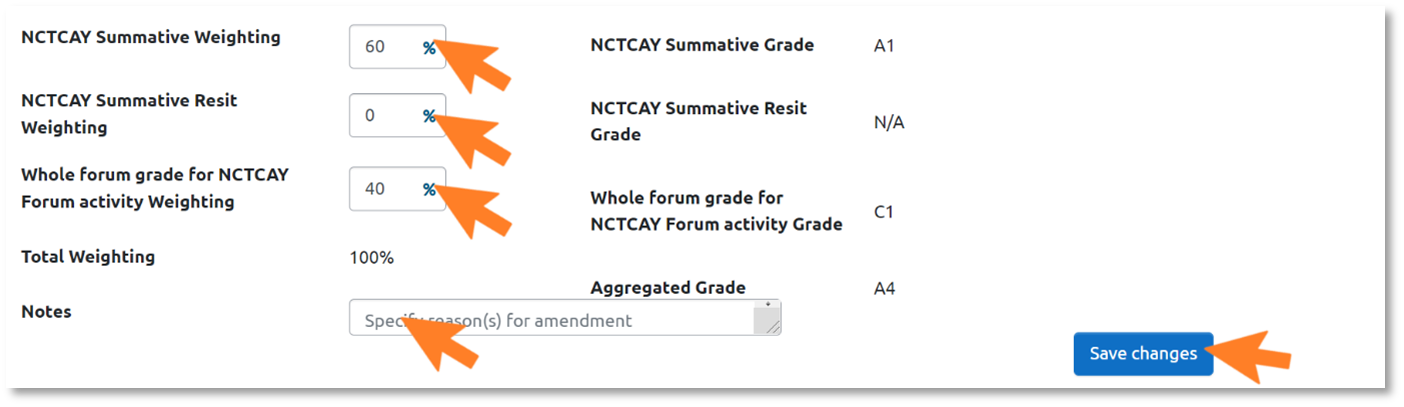
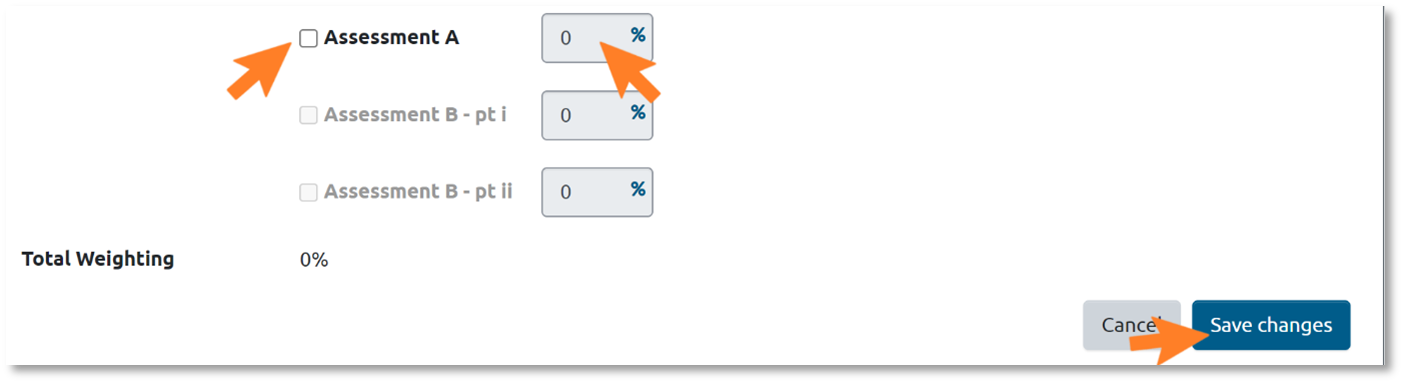
Adjusting Assessment Weightings for an Individual Student
Within the Course Grade Aggregation Tab, the assessment weightings for an individual student can be changed as follows:
- Click the drop-down menu indicated by an ellipsis beside a student’s aggregated course grade
- Select ‘Adjust student’s course weightings’

- On the presented screen, adjust the weightings for each activity
- Enter explanatory note
- Click ‘Save changes’
- A warning message will be displayed when trying to save and the weightings do not total to 100%. Click ‘continue’ on the warning message and the weightings will save.
Adjusting an Assessment Grade for an Individual Student
The grade for a single assessment can be adjusted by adding an additional grade version into the Course Grade Aggregation tab. This can be done as outlined below.
- Click on the dropdown menu indicated by the ellipsis beside an individual student’s assessment grade
- Select ‘Amend Grade'

- Select a reason for the additional grade
- If selected the ‘Reason for Grade’ is ‘Other’, specify the reason in the appearing field
- Select a grade
- This new grade will be available in the Course Grade Aggregation tab for aggregating into the course grade
- Note the reasons for the amendment
- Click ‘Confirm new grade’ to save the new grade for the student
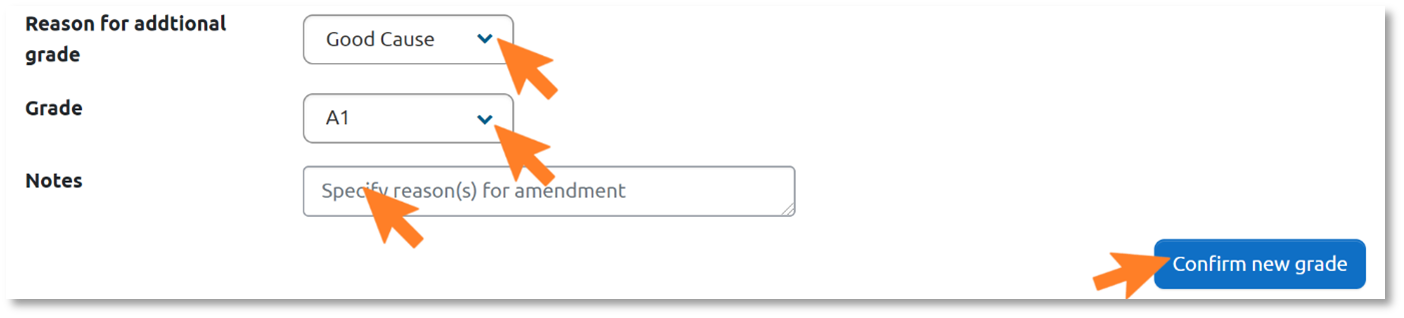
- Optionally, to release the new grade for the student’s assessment to the student, click ‘Release Provisional Grades’ in the Assessment Grade Capture tab.

Aggregated Assessment Grades
Managing MV and NS Grades for Components of Assessments
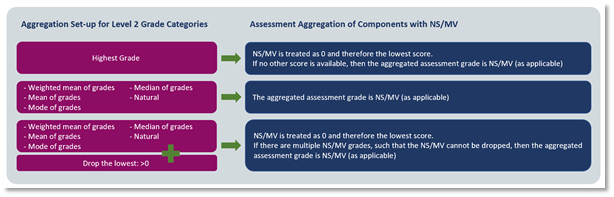
If NS or MV are applied at the component level, the rules for how this is treated is dependent on the chosen grade aggregation type.
If the aggregation is ‘Highest Grade’, then NS/MV is treated as 0 and therefore the lowest score. If no other score is available, then the aggregated assessment grade is NS/MV (as applicable)
If the aggregation is ‘Weighted mean of grades’, ‘Mean of grades’, ‘Mode of grades’, ‘Median of grades’, or ‘Natural’, then the aggregated assessment grade is NS/MV (as applicable)
If the aggregation is Drop the lowest: >0 in combination with ‘Weighted mean of grades’, ‘Mean of grades’, ‘Mode of grades’, ‘Median of grades’, or ‘Natural’, then NS/MV is treated as 0 and therefore the lowest score. If there are multiple NS/MV grades, such that the NS/MV cannot be dropped, then the aggregated assessment grade is NS/MV (as applicable).
Converting an Aggregated Assessment Grade
If the aggregated assessment grade has been calculated using components which are all graded in Points, then the aggregated assessment grade will be a Points grade out of 100. Before course grade aggregation can complete, this grade must be converted into either Schedule A or B.
To convert the aggregated assessment grade:
- Select the ellipsis next to the aggregated assessment grade header on the Course Grade Aggregation screen.
- Select “Add/adjust grade conversion’ from the dropdown menu

- On the grade conversion management screen follow the instructions as outlined in section 2.4.1Setting up a Grade Conversion
- Once the grade conversion has been saved, the Aggregated Assessment grade column on the Course Grade Aggregation screen updates automatically to reflect the converted grades
To see the history of the grade changes, including the conversion:
- Select the dropdown menu for an individual student’s aggregated assessment grade and select ‘Aggregated assessment grade history’.
- The aggregated assessment grade history screen shows the history of the grade, including when the grade has been converted, or changes have been made to a conversion.
- Note that grades which have not been imported into GCAT will not have a full history displayed. No edits can be made to this screen, it is for information only

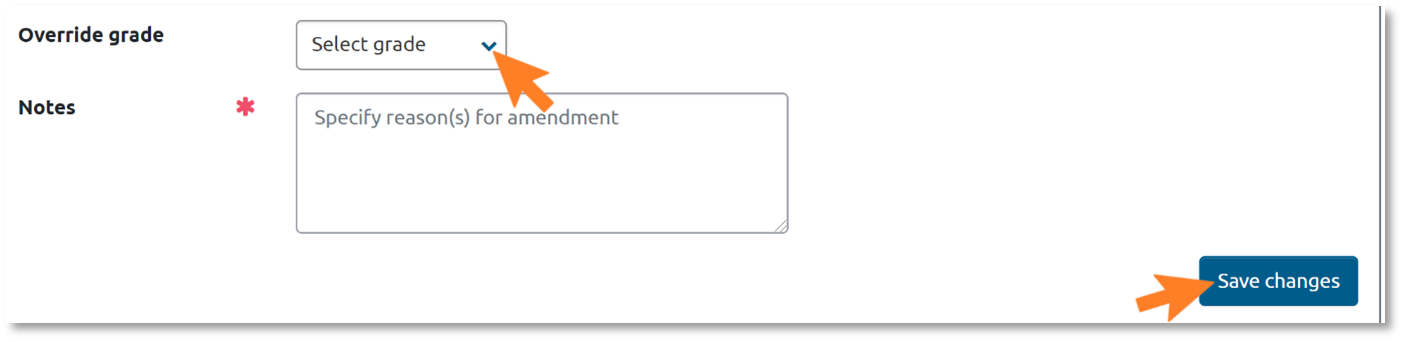
Overriding the Aggregated Assessment Grade for an Individual Student
- On the Grade Capture tab, select the category which the grade you are overriding sits
- Move to the Course Grade Aggregation tab
- In the Aggregated Grade column, click the dropdown menu indicated by the ellipsis next to the relevant grade
- Select ‘Override aggregated assessment grade’

- Override Grade – select grade in the override aggregates assessment screen
- The grades available depends on the scale that the components have been graded in, or converted to.
- If a number has been entered which does not meet the validation rules then the textbox will be highlighted red and the entry cannot be saved until adjusted
- Click ‘Save changes’
- If ‘Cancel’ is clicked, no changes will be saved
The Grade Aggregation screen now shows the overridden grade in the aggregates course grade column
Once an aggregated assessment grade is overridden, this grade remains even when the assessment aggregation is run again until the overridden grade is reverted to the calculated grade.
Aggregation of Components in Different Grade Types
If all the component grades are in the same grade type, then the aggregation and display of the grade is conducted in the same grade type.
If the component grades are in a mix of Schedule A and Schedule B, the aggregated assessment grade should be aggregated using the relevant grade points, and the aggregated assessment grade should be displayed in Schedule A.
If all the component grades are in Points, then these are aggregated to Points, and the aggregated assessment grade is displayed as Points with maximum 100 available points, effectively showing a percentage grade.
If all components are graded in Points, but one is graded out of a maximum 50 points and the other a maximum of 20 points, the aggregated assessment grade is displayed as Points with a maximum of 100 points
If there is a mix, then no assessment aggregation is carried out. All grades must be converted to either all Schedule A or all Schedule B. This will be prompted by a red error box.

Once the grades fit one of the accepted formats as detailed above, then the aggregated assessment grade will be computed as per the above rules.
Changes to Gradebook Made Part-Way Through a Course and Re-Running the Aggregation Calculation
In cases where Gradebook was initially not set up correctly and changes are required part-way through a course, GCAT automatically updates the next time it is opened. However, there are three instances where a manual re-import of component grades is required:
- Sub-category component addition
- Sub-category component grades updated in Moodle
- Sub-category component grade type changed
Any aggregated assessment grades which have been overridden will not be updated.
Aggregated Course Grades
Calculating the Aggregated Course Grade
The Aggregate Grade is automatically calculated according to the process outlined below. However, please note that grades cannot be aggregated if information such as marks or codes (e.g. MV) are missing or have been left blank.
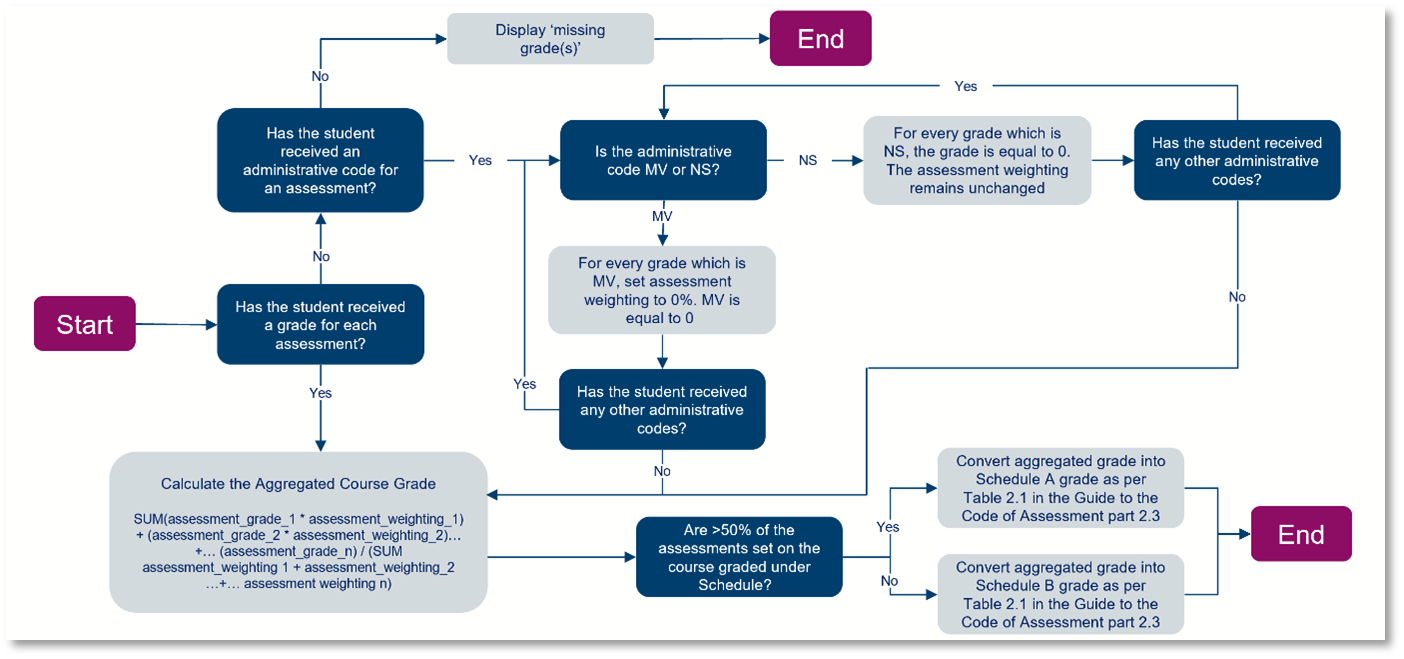
The grades presented are:
- Pulled from the ‘Provisional Grade’ available in the Grade Capture Tool (‘Assessment Grade Capture’ tab)
- If no grade is available in the Grade Capture Tool, then the Grade Aggregation Tool pulls the grade from Gradebook
- If no grade is available in either location, then ‘No grade available’ is displayed
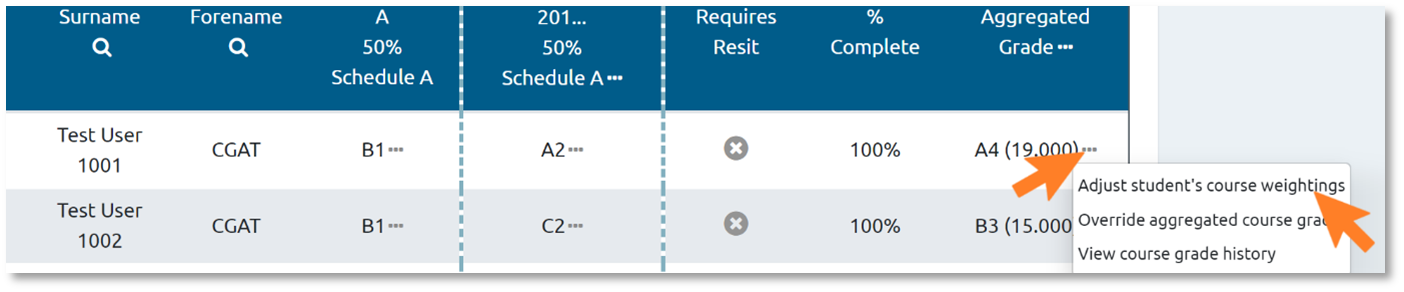
Overriding the Aggregated Course Grade for an Individual Student
The aggregated course grade for an individual student can be overridden in cases where a special code needs to be applied e.g. CW, or if a grade changes following Exam Board review. The aggregated course grade can be overridden at any time, according to local practices.
- From the Course Grade Aggregation tab click the dropdown menu indicated by three dots next to the aggregated course grade for a student
- Select 'Override aggregated course grade'

-
Override grade - select the new course grade for the student from the dropdown menu
-
In addition to alphanumeric grades, the following administrative codes are available, as per the Code of Assessment:
MV
CW
CR
CA
07
AU
FC
-
- Add explanatory notes
- Click save changes
[Image forthcoming - apologies for the delay]
The Course Grade Aggregation tab now shows the udpated grade. This new grade will be included in the .csv download in preparation for uploading to MyCampus.
To revert the grade to the calculated aggregated grade:
- Click ‘Adjust student’s weightings’
- Save the weightings (even if no change is made).
- This returns the grade to the calculated aggregated grade.

Creating Alternative Course Grades
Although GCAT does not calculate grades at Programme level, it can produce two alternative grade types which can be used when calculating grades for degree classifications. These are capped grades for course GPAs, and grades for use in Merit/Distinction classification processes.
Once calculated, these alternative grades will be available in GCAT, and in any .csv file exported.
Note: If you are unfamiliar with alternative course grades, or you are not usually involved in this process, this section may not be relevant to you. If you are unsure, please confirm with a colleague in your area, or the local operational working group members.
To create an alternative course grade, the aggregated course grade must already have been calculated, as described above in Aggregated Course Grades. Then:
- Click the ellipsis next to ‘Aggregated Grade’
- Select ‘Create alternative course grades’

- In the new screen, select the alternative course grade type (either ‘Merit/Distinction Grade’ or ‘GPA Grade’)

Continue below, depending on whether you are adding a merit/distinction grade, or a GPA grade.
Merit / Distinction Grade
To produce a merit/distinction grade as an alternative course grade, follow the steps outlined above in Creating Alternative Course Grades. Ensure that any assessments graded in points have been converted to Schedule A or B (see Grade Conversion). Then:
- Select the assessments to include in the merit/distinction grade:
- These should be the original assessments, not the resit or second sitting assessments
- Add weightings to the selected assessments
- These should be the same as the original weightings for these activities
- Click ‘Save changes’
- The Course Grade Aggregation tab now displays a new column titled ‘Merit/Distinction Grade’
- Note:
- NS grade is counted as 0 in the merit/distinction calculation
- If no grade has been recorded, the Merit/Distinction Grade will display ‘Missing grade(s)’

Overriding a merit/distinction grade
If a student has received MV for the first sitting of an assessment, it will be necessary to override their alternative course grade, to avoid unfairly penalising them for this.
Once an alternative course grade has been calculated, MV grades for any assessment will be highlighted in the Course Grade Aggregation Tab, and a warning message will appear.

To override the alternative course grade:
- Click the ellipsis beside the alternative grade for the relevant student
- Select ‘Override student’s merit/distinction grade’
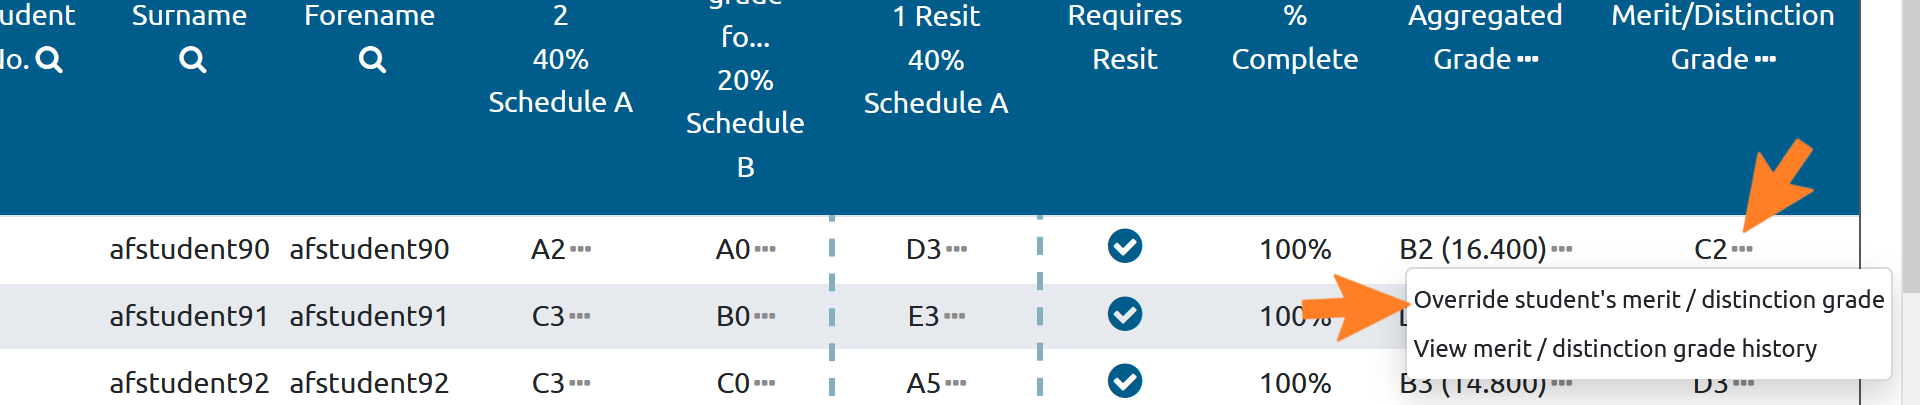
- Select the appropriate grade from the ‘Override grade’ dropdown
- Grades must be entered in the same scale that the components were graded in, or were converted to
- If a number has been entered which does not meet the validation rules, then the textbox will be highlighted in red, and the entry cannot be save until adjusted
- Add explanatory notes
- Save changes
[Image forthcoming - apologies for the delay]
Course GPA Grades
The system calculates the GPA Grade by applying the cap to a student’s course grade if they have received a grade A1-H or NS for any of the selected resit assessments.
- If the aggregated course grade is higher than the capped grade, then the GPA grade will be equal to the capped grade.
- If the aggregated course grade is lower than the capped grade, then the GPA grade is equal to the aggregated course grade.
- If the grade for a selected resit assessment is ‘No grade recorded’ then the GPA Grade will be equal to the aggregated course grade. This will apply to students who have completed an assesment at the second sitting.
- If a student has received MV for the first sitting, their GPA grade can be adjusted to reflect this once it has been calculated (see Overriding a Course GPA Grade below)
To create a GPA grade, first follow the steps outlined above, in Creating Alternative Course Grades. Then:
- Select the resit assessment(s)

- Select the cap (PG, UG or ‘Other’) to apply to the course grade
- If ‘Other’, select the grade from the drop-down menu
- Click ‘Save Changes’

- The Course Grade Aggregation tab now displays a new column titled ‘GPA Grade’

Overriding a Course GPA Grade
If a student has received MV for the first sitting of an assessment, it will be necessary to override their alternative course grade, to avoid unfairly penalising them for this.
Once an alternative course grade has been calculated, any MV grades will be highlighted in the Course Grade Aggregation Tab, and a warning message will appear.
To override the alternative course grade:
- Click the ellipsis beside the alternative grade for the relevant student
- Select ‘Override student’s GPA grade’
[Image forthcoming - apologies for the delay]
- Override Grade – select the appropriate grade
- Add explanatory notes
- Click save changes
[Image forthcoming - apologies for the delay]
The Course Grade Aggregation tab now shows the overridden grade.
[Image forthcoming - apologies for the delay]
Once an aggregated assessment grade is overridden, this grade remains even when the assessment aggregation is run again until the overridden grade is reverted to the calculated grade.
Editing the Alternative Course Grade Set-up
It is possible to edit the set-up of an alternative course grade if, for example, you have included the wrong assessment in the calculation or wish to cap at a different grade.
- Select the ellipsis next to the header of the grade
- Select ‘Adjust alternative grade set-up’
- On the ‘Create alternative grade’ screen the previously added information can now be edited

Exporting the Aggregated Course Grade
Once the aggregated course grade for each student has been ratified by the Exam Board, a formatted .csv of the ratified grades can be downloaded.

This can be uploaded to MyCampus and the results communicated to students.
Managing resits in GCAT
Resits can be set up and managed following the guidance in Setting Up a Level 2 Grade Category and Components. Use the aggregation method ‘Highest Grade’, and make sure that both your resit and the original assessment are stored under the same Level 2 Grade Category.
Highlighting a student for resit
- To highlight a student for a resit, open the Course Grade Aggregation tab and tick the box in the ‘Requires Resit’ column
-
No action is driven off this tick box. It is used only as a visual indicator for staff as to which students will be resitting an assessment.
-
We recommend taking this step, even if you have already added students who are resitting to a group, as in the Moodle Enhancements guide.
-

Calculating the Aggregated Course Grade for Resits
Once the resit assessments have been marked, the grades should be imported into the Grade Capture Tool - see Importing an Activity's Grade into the Grade Capture Tool.
GCAT will automatically select the higher of the two grades for any student who has taken a resit assessment. Guidance on how to deal with capped grades following a resit for the purpose of a course GPA can be found below, in Calculating the Course GPA Grade.
Calculating the Course GPA Grade
While a student after a resit gets the best of two grades included in their aggregated course grade, if they have had anything as a resit then what goes into their programme GPA is capped at 9 or less for a UG and 12 or less for a PG.
To create a GPA grade follow the steps outlined in section Creating Alternative Course Grades and add the following:
- Select the assessments which are resit assessments
- Select the level of cap (PG, UG or ‘Other’) to apply to the course grade
- If selected ‘Other’, select the grade from the drop-down menu, which contains a list of grades 22-0 in numeric form.
- Click ‘Save Changes’
- The Course Grade Aggregation screen now displays a new column titled ‘GPA Grade’
- The system calculates the GPA Grade by applying the cap to a student’s course grade if they have received a grade A1-H or NS for any of the selected resit assessments.
- If the aggregated course grade is higher than the cap, then the GPA grade is equal to the cap grade.
- If the aggregated course grade is lower than the cap, then the GPA grade is equal to the aggregated course grade.
- If the grade for a selected resit assessment is ‘No grade recorded’ then the GPA Grade will be equal to the aggregated course grade
- If a student has received ‘MV’ for any assessment, then this is highlighted in red and a warning message notifies of the need to override the GPA grade.
Releasing final course grades
Following the exam board, after all required grade reviews have been conducted, you can release the final course grades as follows:
- Access the Course Grade Aggregation tab
- Click ‘Release final assessment grades’
