

Working with content
Saving and publishing your work in t4
Important: 'Save and approve' is the only save option in t4 that will make your updates publish and appear on the website. Be aware this is not the default option.
Save and approve
This is the save option to choose if you are ready for you work to appear on the website.
- It assigns your edited content to the scheduled overnight publish.
- The overnight publish updates the live website (www.glasgow.ac.uk)
How to select 'Save and approve'
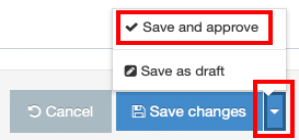
- Scroll to the bottom of the t4 template you are working on.
- You will see the blue button labelled 'Save changes'. But don't select this option.
- Instead, select the small triangle icon next to 'Save changes'. This reveals two other options.
- Select: 'Save and approve'
- You will be returned to the 'Content in this section' view: the Status of the content item you just edited will appear as Approved.
Using section links
For any internal links to other webpages in t4 you should always use a section link: under the links button on the editor:
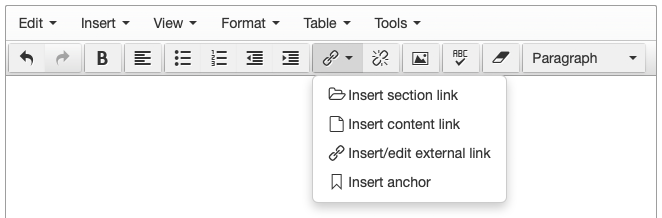
Content links should only be used if you want to link to a piece of content created using the story content type, or if you want the destination of the link to be somewhere other than the top of the page.
Using these means the link will not break if the target section or content is moved.
The external link tool should only be used if you are linking to content not in t4.
Revert content to an earlier version using 'History'
- Select 'Content' > 'Edit content' from the left hand menu
- Navigate and select the Section that contains the desired Content Item (note: you can skip the first step and do this directly).
- Click the blue 'Actions' button associated with the desired Content Item and select 'History'.
- This will display all previously saved (excluding 'save as draft') versions of this Content Item. From the 'Actions' drop down button you can 'preview' an earlier version
- If you want to revert the Content Item back to this version, choose 'make current' from the blue 'Actions' button.
- A new pop-up window appears. Select 'Confirm' to make the change happen.
- You can also select and compare different versions of the Content Item by using the check boxes and the 'Compare selected' button
Mirror content to different sections
- Select 'Content' > 'Edit content' from the left hand menu
- Select the section that contains the content item that you wish to mirror
- Select the blue 'Actions' button corresponding to the Content Item that you wish to mirror
- Select 'Mirror' and the entire site structure of t4 will appear
- Select the section in which you want to place the mirrored content item
- You will return to the section where you mirrored the content from. You will see the content item highlighted by a 'Mirror' icon
 .
. - You can then navigate to the section you mirrored the content to. You can check it is there. You may need to reorder it as it will be last Content Item in the section.
Permanently remove content
See our guidance on Deleting and archiving content.
Tables
Tables should be used sparingly, and only for tabular data. In general, tables do not display well on small-screened devices, where a vertical flow of text is much easier to read.
Re-order content
You can drag and drop content to re-order it:
re-order content
Top tip
Don't publish more than you can maintain