Adding images and documents
Media library location
- Content > Media library
Uploading media (images and documents)
Before uploading anything to the media library, please ensure you are entitled to do so: do not breach copyright, and do not upload files that contain personal data: names, addresses, contacts, images; without informed explicit consent.
- From the navigation menu, choose 'Content > Media Library'
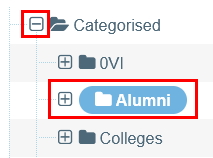
- Open 'Categorised' using + and select the Media Library folder you have access to:
- Select + Add media.

- Fill out the following boxes and leave the rest blank:
- Drop file or click to choose the file you want to upload.
- Media type. In most cases, this will be chosen for you. If not, select the associated file type from the text links. Please contact the webteam if you wish to upload a file type not listed.
- Name. Insert a sensible name so that you can find the file in the media library later.
- Description. Text inserted here is used to describe the file within the final published web page. In the case of .jpg and .gif image files, this text is displayed in the browser when a visitor hovers over the image with their cursor. This text also forms the alternative text or "Alt tag" description that visitors using assistive browsing technology will have read out to them. For example, the descriptive text associated with an image allows meaning to be conveyed to a visually impaired person.
- Select Save changes to upload the file to the media library.
Edit or update an item in the media library
- Open the media library
- You can select an image or document by selecting its name, or by using the 'Actions' drop-down.
- You can now rename the item or upload a new version over the top of the existing item.
Video
Do not upload video files to the t4 media library.
Inserting images and documents into a webpage
- Once you have uploaded an item to the media library, use the 'insert from media' button in the text editor to add the image or document to a webpage.
- If adding a document (Microsoft Office document or PDF), the name of the document in the media library will appear as the name of the link on the webpage.
Image quality and things to avoid
- Use good quality imagery. This doesn’t mean images have to be professionally shot: smartphone images are acceptable if the quality is good enough.
- Always preview the image and check the quality before you publish it.
- If you don’t have access to a photo library, then the Flickr Creative Commons pages are a great place to start looking. (Go to the advanced search section and click ‘Only search within Creative Commons-licensed content.’)
- Whatever image you use, it should not be blurry, grainy, stretched, pixelated or badly lit. Avoid obvious stock photography which can look cheesy and false. Try not to say too much with the feature images. When in doubt keep the image simple and let the text tell the story.
- Also avoid using images of marketing material containing a lot of text. Instead, use the main image from the marketing material and put the relevant text in the story title and description.
Image formats
- We recommend using WebP for most of the images on our website, except in cases where the image will be repurposed for use in an email.
Image sizes
navigation tile
- Width: 700px
- Height: consistent [300px preferred]
image in standard content
- Width: 925px
- Height: varied
image in quick links/
staff profile portrait
- Width: 300px
- Height: varied
splash/feature/slideshow
- Width: 1400px
- Height: consistent
story summary/video thumbnail
- Width: 700px
- Height: 300px
We recommend that web images are kept under 100Kb in size. When you have a low file size which is web friendly it will not take a long time to load up when people browse your website.
Resize images before uploading to the media library
- It is good practice to set your image size before uploading to the media library. This keeps the file size down and also gives better results when displaying the image on the page.
- If you don’t already have access to an image editing program such as Photoshop or Paint, there are several free image editing programs available online or as a download. These include:
- Paint.net (now available to install from the UofG Software Centre)
- Resize images in Paint.net, or see our Web images & Paint.net tutorial PDF
- PIXLR
- Sumopaint
- IrfanView
- To resize in IrfanView:
- Open your image
- Select Image > Resize/Resample
- Type in the new dimensions in width and height. Note that by default the editor will automatically set a height if you input a width and vice-versa
- Click 'ok'
- Paint.net (now available to install from the UofG Software Centre)
Left or right align an image and allow text to wrap around the image
When editing a content item, double click on the image. A pop-up window will appear named 'Set media attributes'. Now insert the text 'left' or 'right' into the box named 'class'.
Delete any text that may appear in the box named 'float'.
Alternative (ALT) text
- Alternative text, or alt text, is used as an alternative to an image for people who use screen readers.
- Use alt text where you need to help users understand the visual content. Don’t always make the alt text a literal description of the image: think about what point the image is making.
- One piece of advice is to imagine that you’re reading out the content of the page down a telephone. When you get to the image, what would you say about it to help the listener understand the point the page is making?
Adding ALT text
To add an ALT tag for an image in t4, you must add a description to the image in the Media Library. To add a description:
- Select Content > Media Library
- find the image within your media library
- Select or edit the image
- Enter the image description in the box named 'Description': use text that fulfills the same function as the image.
For more information please see the following web accessibility article on Alt text.
Sourcing University images
We have a password-protected marketing communications photo library covering a wide range of subjects; from buildings to student life. It’s available at: https://cameralibrary.gla.ac.uk:8095/pink/.
For account infomation, contact: peter.howard@glasgow.ac.uk