

Moodle Administration
This section has content relating to managing courses - click on the tabs below to see more.
Moodle.org > Complete documentation on Managing a Moodle course. (Opens in a new tab.)
Blocks - Category Level
This section shows you how to create and manage a Block that will appear in all courses with a Moodle Category.
For example, you could create a Text block with links to resources relevant to all students within a programme, and then make it available within all the courses in that programme.
Click here for more information about managing Blocks.
Click here for a step-by-step guide with images.
Steps to add a Moodle Category Block:
- Click on Home > Click on chosen category > Turn on Edit mode > Open Block drawer > Add a Text block
- Click on block settings cog > Select 'Configure [...] block > Enter title and content > Under Page contexts, select 'Display on ‘Category: […]’ and any pages within it' > Save changes
Moodle.org documentation > Blocks, Course categories (Opens in new tab.)
Blocks Management
This section shows you how to manage Blocks in the Block drawer.
You can open and close the Block drawer using a control on at the top right of the screen.
By default, most blocks only show on the main course page, but you can configure them to show on other pages also.
Blocks can be used to simplify editing a course, and to display extra information for users. You can add or delete them as you wish. Commonly used blocks are:
- Activities: this block lists the different activities and resources available in your course. When clicked on, it provides a page with all the selected activities or resource on one page.
- Completion progress: this block visually shows activities/resources a student is supposed to interact with in a course, and is colour-coded so students can quickly see what they have and have not completed. NB: all activities/resources need to have their completion status configured, and also note that the Tiles format has options that render this unnecessary.
- Latest announcements: this block shows the most recent posts made in the ‘Announcements’ forum available by default in all course.
- Mass actions: this block allows you to apply one action (e.g. delete, duplicate, move, etc.) to a number or selected activities or resources. NB: students do not see this block
- Text: this block allows you to add custom text or images. NB: this can also be added at the Course category level, and displayed in all courses within that category – see here for more details.
Steps to add a Moodle Block: Turn Editing On > Open block drawer > Add a block > Select a block
View this document to for a step-by-step how-to guide. (Opens in new tab.)
Moodle.org documentation > Blocks (Opens in new tab.)
Changing the Course Formats
Course formats are the layout of the course, the most commonly used formats at UoG are the Grid, Topics, and Collapsed topics. The content is not affected by the format - it only changes the way the content is laid out.
We recommend using either the Collapsed Topics or Grid format.
Steps to access the Course format options: Course Settings > Course format > Format > Use the drop-down menu.
Moodle.org documentation > Course formats (Opens in new tab.)
Completion Tracking and Restrictions
Most activities in a Moodle course can be linked in sequence so that – for example – a student cannot access an Assignment without completing a Lesson or watching a video. Restrictions can also be applied to Groups and/or individuals.
There are three settings that need to be enabled:
- In Course Settings, turn on Enable Completion Tracking
- Within each Activity that is to be required for access to another Resource or Activity, the Activity completion settings need to be set. Students can manually mark as complete, or certain conditions (e.g. a specific grade) can be specified.
- In the Activity or Resource that is to be accessed after another one, the Restrict access settings need to indicate what Activity completion is required
Building Pathways Through Moodle (UoG recorded upskilling session – 28 mins. Log in using the Single Sign On (SSO))
Moodle.org documentation: (Links open in new tabs)
Creating and Managing Moodle Groups
This section shows how to create groups of students within Moodle. These are used to separate students based on project groups, tutorial groups, groups to be allocated for grading, and so on.
Activities and/or resources can be restricted to specific groups. A typical use would be within an Assignment, where one student can submit on behalf of a group, and when the assignment is graded all students in the group get the same grade and feedback.
In a Forum, students can be restricted to only see other members of the same group. Messages can also be sent to a specific group of students.
For grading, a group such as a tutorial group can be allocated to a specific grader.
Note that students can be in more than one group at the same time – group membership is not exclusive.
Groups can be aggregated into Groupings that function in the same way.
To see how to automatically create Groups based on seminar groups created during enrolment on MyCampus, see Auto-Enrolment and Group Creation.
Download the How-to guide. (Opens in new tab.)
Resources
(Links open in new tabs.)
Moodle.org documentation:
Learning Innovation Support Unit resources:
Auto-Enrolment and Group Creation
This section contains information on how to use the MyCampus records to enrol students into a Moodle course, and create Moodle groups based on categories in MyCampus.
The recommended student enrolment method is the auto-enrolment using the UofG Enrolment database.
Moodle understands the University’s course codes. It is possible to add one or more class codes to a course, and all the students in these class groups will be automatically added to the course. Moodle talks to MyCampus from time to time, so the course will be automatically updated with any late enrolments.
You can also manually trigger the synchronisation with MyCampus.
It is also possible to create Groups based on the MyCampus seminar/tutorial enrolments.
NB: The enrolment will not be triggered under any of the following conditions (see Rollover Guide for more information):
- The course is hidden (see step 5 in the Rollover Guide)
- The Course start date is in the future (see step 6 in the Rollover Guide)
- There is no Course end date (see step 6 in the Rollover Guide)
For more on Groups, see Creating and Managing Moodle Groups.
Click here for a step-by-step downloadable document. (Opens in new tab.)
Moodle.org documentation: Enrolment methods (Opens in a new tab.)
Moodle Gradebook Setup
The Gradebook
Graded activities in Moodle will auto-populate in your course gradebook. Graded activities include Assignment, Quiz, Lesson, Workshop, Forum, and H5P. Students can view their grades in their course gradebook, and staff can see the whole class’s grades for all the different assessed activities. Gradebook will also apply weightings to graded activities and perform aggregation to produce an overall course grade for students. This needs to be setup according to the course grading scheme using the Gradebook Setup feature in Moodle.
Before You Begin
Before you start setting up the Gradebook, make sure you are familiar with the course grading scheme. You will need to setup the gradebook to align with the different assessments in the course and apply the correct aggregation methods and weightings. The course assessment scheme is detailed in the course PIP document, available from the University Course Catalogue. If in doubt, check the assessment requirements in the course’s PIP document first.

Resources (links open in new tab):
- Gradebook Setup user guide.
- Job aid that highlights typical setup requirements.
- Moodle.org documentation > Grade categories (Opens in new tab.)
Customise Student Gradebook View
Sometimes students contact staff to enquire about percentages in their Moodle Gradebook that are causing confusion because they do not reflect their understanding of the 22-point scale.
By default, the following percentages are shown although they do not relate directly to the grade:
- Calculated weight: the weighting allocated to the assignment in the Gradebook setup
- Percentage: the percentage value of the grade given for the assignment
- Contribution to the total: the weighted contribution of the assignment to the overall course grade
You can remove these from the student view by changing the Course grade settings in the Gradebook setup.
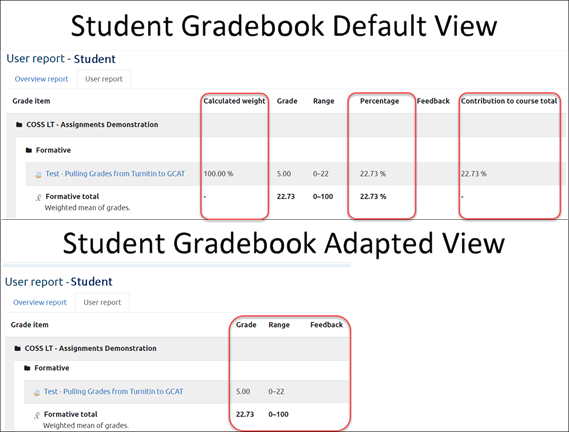
Steps: Gradebook setup > Course grade settings > User report > Hide selected columns
Download the how-to guide. (Opens in new tab.)
Moodle.org documentation > User report (Opens in new tab.)
Duplicate content to another course
This section will show you how to copy content from one course into another course by using the Duplicate to another course function.
This function is in the Mass actions block that you may need to add to the block drawer.
NB: you need to be enrolled as a staff member in both the course you are copying the content from, and the course you are sending content to: see here for how to enrol a staff member. (Opens in new tab.)
When is this relevant?
This is relevant when you want to use and/or adapt content from one course into another. It is an alternative to the Course reuse > Import process.
Resources
(Links open in new tabs.)
- Download the How-to guide
- Moodle.org documentation > Mass Actions block
Enrolling Students
Options for enrolling students are:
- Auto-enrolment by using the course code via Course settings
- Using multiple course codes via the UoG Enrolment database (Student) option
- Self-enrol: students press a button to self-enrol
- Manual enrolments: lecturer selects students to be enrolled
Steps to access enrolment options: Top menu > Participants > Click on Enrolled users > Enrolment methods
Resources
(Links open in new tabs.)
- Student enrolment: view and download a PDF guide
- Moodle.org documentation > Course enrolment
Enrolling Staff
Anyone who is already enrolled as Staff can enrol another person onto a Moodle Course.
If you can see the Turn Editing On button on the front page of the Moodle course, this means you are enrolled as Staff.
To bulk enrol students onto a course, the Auto-enrolment function is recommended.
Resources
(Links open in new tabs.)
- Download the How-to guide
- Moodle.org documentation > Manual enrolments
Moodle Course Rollover with Copy Function
This section shows how to rollover a course using the Copy function. However, if you wish to exclude a significant number of items from the copy, then you may wish to use the ‘Backup and Restore’ method which allows you to remove them as you make the backup.
Resources
(Links open in new tabs.)
- Download the How-to guide
- Moodle.org documentation > Course copy
- Moodle.org documentation > Course backup